
Friday, June 21, 2013

Slammin' salmon

If I could pick one food to eat for the rest of my life, hands down, it would be salmon. I like it raw, cooked, seared, and everything in between. I have for as long as I can remember, and I always will.

So when the Whole Foods in Bellingham, Massachusetts offered me the opportunity to sample their (amazing, delish, beautiful, scrumptious) fresh salmon and come up with a few recipes using it, I jumped at that chance.

First off, it's well-known by visitors of this blog that LOVE*LOVE*LOVE Whole Foods. I go there and grab lunch all the time. Sometimes, it's from their prepared foods bar, sometimes from the deli, sometimes a salad or sandwich, but who am I kidding -- it's most often sushi. I love Whole Foods because not only can I get ingredients there I can't get ANYWHERE else, their food is different. It's local. It's fresh. It's delicious. And if you ask any of the people who work there, they can tell you where it came from. Quite frankly, I feel good at Whole Foods. Click here to find your local Whole Foods!

I never used to like cooked salmon, because I thought it tasted too fishy. But once I bought it and cooked it myself, I realized the degree of fishiness has do with the freshness of the fish and the method used to cook it -- salmon isn't "fishy" as a rule. Broiled, grilled, however you prefer it -- you want the freshest fish and freshest ingredients. Whole Foods is just the place for that.

Today -- AND TODAY ONLY -- Whole Foods is having a sale on Wild Sockeye Salmon for $11.99/pound. The recipes I made don't HAVE to use that particular kind but, well, they would be scrumptious if you used that. In the interest of full disclosure, the salmon Whole Foods gave me for these recipes was King Salmon, a more mild fish that's fabullously rich and buttery.

So even if you aren't able to get to Whole Foods today, try to get there soon -- the quality of all of their ingredients is unrivaled and their salmon (sweet Mary, THE SALMON) is delicious beyond words.

Already have your salmon and looking for ideas of what to do with it? I've got two recipes absolutely worth trying -- both fresh and healthy, and -- boohoo apartment living -- neither requires a grill. Read on and enjoy!


Summer Salmon Kebabs
Serves 4  
Ingredients
1/2 pound fresh raw salmon
about 1 cup raw bell peppers (I used red, orange and yellow), cut into 1" pieces
red onion cut into large 1" chunks
2 tomatoes on the vine, cut into 1" chunks (or use grape/cherry tomatoes)
1 tablespoon soy sauce 2 tablespoons peanut sauce*
1 teaspoon honey
salt and pepper
olive oil
lemon (optional)

Tools 
wooden (or metal) kebab sticks
cookie sheet
aluminum foil
ziploc bags (2)

Cut skin off salmon and cut into chunks about the same size as vegetables.

Combine peanut sauce, honey and soy sauce in Ziploc bag and toss in salmon. Let marinate for minimum one hour, up to overnight in refrigerator.

When finished marinating, turn broiler on low, cover cookie sheet with aluminum foil. Drizzle with olive oil. On sticks, stack pepper, onion, tomato pieces with chunks of salmon. Set gently on pan. Once all kebabs are finished, broil on low and on middle rack of oven for 10 minutes, flipping once at 8 minutes. Squeeze fresh lemon juice over kebabs while still hot. Serve over rice or rice noodles.


Sweet and Sour Chili Salmon
Serves 2
Ingredients 
1/2 pound fresh raw salmon, thinly sliced
1/2 cup rice vinegar
2 tablespoons chili garlic sauce*
2 tablespoons water
about 1 cup cucumber sliced
1 tablespoon chopped red onion or shallot
1 teaspoon salt

Tools
cookie sheet
aluminum foil
slotted spoon

Create marinade for salmon by combining 1/4 cup rice vinegar and 1 tablespoon chili garlic sauce in baggie. Toss in salmon, marinate for one to two hours in refrigerator.

In separate bowl, combine salt and cucumber slices, and let sit for half an hour. This will draw the water out of the cucmbers. Lay them out on a paper towel and dry them off, toss them into a dry bowl.

Combine remaining vinegar, chili sauce, water and onion or shallot in a small saucepan and bring to a boil. As soon as mixture starts to bubble, remove from heat and pour over cucumber slices.

Cover cookie sheet with foil, place salmon slices on pan, sprinkly with salt and pepper, broil on low for 8 minutes.

Use slotted spoon to put cucumber slices on plate, place salmon on top. Serve while salmon is still hot. Enjoy!


Notes:
*Chili Garlic Sauce: I'm specifically talking about this product, that I got at the grocery store. It's about $4 and very versatile!
*Peanut Sauce: This came directly from Whole Foods. It has a deeply rich peanut flavor and it's organic.


*Disclosure: I was provided with a sample of salmon from Whole Foods for this post. All opinions expressed within are wonderfully and deliciously my own.

I'm back baby!

Well hi there! It's been a long and crazy journey. Two years and a whole lot of changes later, and I'm back. Madame Menu has been calling my name for some time, and I'm finally ready to do this again. I've gone through a lot of changes in the past two years and so has my life. Reasonably soon, things will look a little different around here to reflect that. Stay tuned... I'M BACK BABY!

Monday, May 23, 2011

Caprese Summer Pasta with Shrimp

Hey-o! Sorry I've been gone so long. I needed to take a little break to travel, prepare for an upcoming event I'm doing Memorial Day weekend (more on that later!) and do some fundraising.
I made this pasta for dinner last week, and it earned rave reviews. I served it hot, but you could also serve it cold, or even in place of a pasta salad at a picnic. It's fresh and the flavors are bold, and that makes it a perfect dish as the weather gets warmer.

I used gemelli pasta for this recipe, because I think the spirals hold onto the sauce better, and I like the denser texture. If you have all the other ingredients, by all means don't go to the store -- use what you have on hand for pasta!


Enjoy!

Caprese Summer Pasta with Shrimp
Serves 4

Ingredients
8 ounces gemelli (or your favorite pasta)
1/2 pound raw shrimp, peeled and deveined*
1 pint of grape or cherry tomatoes, halved
4 ounces goat cheese (NOT herbed)
1 cup raw spinach
2 tablespoons salted butter
3 cloves of garlic,* minced
1/2 tablespoon olive oil
1/2 cup pasta water, reserved*
salt for pasta water
pepper

Tools
large pot for pasta
large sautee pan
grill*

Boil water for pasta, cook pasta as directed, reserving about half a cup of salted water. WHILE the water boils...

Remove tails from shrimp. Toss in a bowl to coat with olive oil. Salt and pepper to season. Grill until the shrimp turn pink on both sides, turning once. Put aside.


In large sautee pan, melt 1 tablespoon of butter over medium heat. Add garlic, spinach and tomatoes. Stirring frequently, cooking for 3 or 4 minutes or until spinach is completely wilted.

When pasta is done, drain (do NOT rinse) and toss into pan with tomatoes and spinach. One-quarter cup at a time, add pasta water and toss with pasta and vegetables to evenly distribute. Crumble goat cheese over the hot mixture, and stir to combine. Some will melt. That's OK.

Add shrimp, serve.


Notes
*Garlic: If you read this, you know I often use jarred garlic. This recipe is no exception. If you use the ginormous jar of Spice World Garlic I do, use about 1 tablespoon for minced garlic for this recipe.

*Shrimp: In the last 5 years, I've cooked many, many, many shrimp dishes. I'm a seafood person. I've used every type of shrimp you can buy -- frozen, fresh, raw, cooked, salad, jumbo, extra jumbo and everything in between. I try to use 16-20 count shrimp for my recipes, but they aren't always available. When they aren't, I go with 31-40 count. For this recipe, any size should work, as long as you have about half a pound. For the raw/cooked debate... I VASTLY prefer raw shrimp. Once you cook them, they take on the flavor of what you're cooking. If you use the cooked kind, they tend to taste brininer and like, well, seafood water. Who wants to eat that? Go for raw. If you get them frozen (that's OK!), put them in a bowl of cold water (yes, cold). Let them sit for 5 minutes. Drain, and refill with room temperature water. Let the shrimp sit for a good 10 minutes and they should thaw. Take them out of the water, peel, devein and de-tail them. Ready to cook!

*Pasta water: What a simple and magical ingredient! The pasta water's job here is to bind all the ingredients together. Rather than using tons of butter or olive oil, add pasta water and it instantly makes a sauce. It keeps everything most and not too oily, and adds tremendous flavor.

*Grill: I used our outdoor gas grill for this, because I love to grill. I love the flavor imparted to the ingredients from it, and it really tastes like summer to me. If you don't have a gas grill available, feel free to use a George Foreman grill or even a grill pan. If you still don't have that available, use the olive oil and just roast the shrimp in the oven. We aim for versatility! :-)

Sunday, March 20, 2011

2011 Worcester Food and Wine Festival

It isn’t often I get to try 15 different dishes for dinner. It isn’t often they’re accompanied by sips of a few different fantastic wines. Luckily for me, the Worcester Food and Wine Fest allows me to indulge once a year –- a chance to sample tasty foods from more than 25 local eateries and wines from all over the country is well worth the drive up 290 for me.

This year’s event was held March 7th, at the DCU Center in downtown Worcester. The food and wine fest, now in its ninth year, is sponsored by Austin Liquors of Worcester and serves as a fundraiser for the Worcester Jewish Community Center. Proceeds go to fund the scholarship program at the JCC.

The evening’s special and long-traveled guests were members of the Benziger family -– the owners and operators of Benziger Family Winery in Glen Ellen, California. The family brought several of their wines, including Tribute, a newly-released wine well worth its $80/bottle price tag. Their booth was packed with eager tasters all evening.

Walking into the ballroom, I did a lap around to scout out which booths were in which corners, which had the most visitors, and then I went in for the kill. First stop –- Baba Sushi.

If you know me personally or follow me on Facebook or Twitter, you probably know that I eat sushi. I eat sushi a lot. I eat a LOT of sushi. I’m not discriminating, and while I have my favorites (I really could live on salmon), I’m willing to try anything once.

So it should come as no surprise that I have actually eaten at Baba Sushi before. I was eager to see though, since they ran out of food very early at last year’s festival, what kind of presentation they’d have and how they would handle so many guests who may not be keen on eating something with raw fish. The answer: perfectly.


Chef and owner Wilson Wang was gracious and charming, and delighted to hear that I’d try anything offered to me. He handed me a plate full of goodies with a piece each of seven different rolls -– among them eel. I’m not normally a fan of eel, but this eel wasn’t the least bit fishy or gamey. All Wang’s creations were as fresh as can be and delicious.

I moved on to the Rodney Strong booth and sampled their Chardonnay, which was the perfect wine to start off the evening. It was light and fragrant and didn’t leave an aftertaste. They’re a Sonoma-based label with many, many accolades to their name. Now I know why.


Next up were the tuna wontons from Not Your Average Joe’s. I knew these would be good –- putting tuna in a wonton, how can you go wrong? -– but I had no idea they’d be THIS good. I stopped by the booth and chatted with Chef Seth Caplan about the restaurant.


Located right on Route 9 in Westborough (just across from Herb Chambers), Chef Caplan told me the restaurant makes all dishes –- start to finish -– from scratch. The menu shows a diverse and affordable offering to suit any palate. Try the ahi tuna wontons, definitely “not your average” appetizer, for a very reasonable $11.

I made a stop at the 90+ Cellars booth and tried a glass of their full-bodied Argentinean Malbec (Lot 23, if you’re shopping their website). Delicious!


I also made a festival buddy: Rachel Healy, one of the pourers from 90+ took a walk around and sampled a few dishes with me.

We both went back for seconds (maybe thirds) for guacamole from Mezcal Cantina. I can only imagine what it’s like to have it prepared at your table as it is at the restaurant. Even feeding a ballroom full of people, the guacamole didn’t show even a hint of sacrificing quality for quantity.

We stopped quickly at the Publick House table and grabbed Thanksgiving paninis, which I’d write more about, but they were gone far too quickly! At last year’s festival, the restaurant did sweet potato ravioli with a Kahlua cream sauce (so good I haven’t forgotten!). I have never dined at the restaurant, but it’s been made abundantly clear that they do comfort food, and they do it well.

Next I ventured over to the Struck Catering table, and tried something I never eat – lamb. This wasn’t just any lamb, it was really something special. They offered honey corn cakes topped with a smoked lamb hash, hard-boiled quail egg and a hollandaise drizzle.


I wasn’t really sure what to expect, because, well, I don’t generally eat anything like this, but I wasn’t let down. While the quail egg wasn’t really my style (speaks nothing of the way it was cooked, only my palette), the lamb was deliciously flavorful. I could taste the smoke in a very good way, and the corn cake was the perfect accompaniment. Well done.

I decided on one more sampling of wine before hitting the vast dessert selection, and I chose to end the evening with a lovely glass of Flip Flop 2009 Washington Riesling.


This wine –- which is only about $6 or $7/bottle -- is surprisingly fruity (I tasted pineapple, but not overwhelmingly) and delicious. It made for a great lead-in to the sweets I was about to devour.

If I talked at length about each of the desserts I ate, this blog would go on for pages. I can say I wasn’t let down with a single offering.

On the Rise Baking’s spongecake with berries, chocolate cookies with a hint of cinnamon and triple chocolate cupcakes were absolutely fabulous. Chef Elizabeth Casey couldn’t have been nicer, and even let me snag a second cookie. Anyone offering me EXTRA dessert deserves top billing in my book!


Next up was one of my favorites from last year’s event -– Webster House. Greeted with the same smiles I saw last year, I will admit I grabbed two of their bite-size lemon ricotta cheesecakes. Come on, it’s cheesecake! I don’t regret it for a second, they were tiny bites of heaven.

My last dessert stop was the Sweet table, where I spoke with Chef Alina Eisenhauer. She mentioned Sweet was being featured on Food Network’s Cupcake Wars the next evening, and I tuned in. She didn’t take home the title, but made it to the second round and for good reason – her margarita cupcakes were deservedly the stars of the show.


I was absolutely amazed… these cupcakes genuinely taste like a margarita! While they were the only selection I tried, I suspect Rachel went back for more! Here she is with Chef Alina.


I’ll definitely be stopping by Sweet in the next few weeks. Aside from private catering and even “College Care Packages,” the Shrewsbury Street location has a pastry shop open until 1am on Fridays and 2am on Saturdays (!), and a private dessert bar that would be a perfectly romantic end to any date night.

I left full and happy, as any foodie would. I look forward to this event each year, but especially now with the flavors of this year’s still fresh in my mind. Looking forward to trying some of the restaurants from the festival in the next few weeks, and seeing what else they have to offer. Thanks to the Worcester JCC for letting me attend, and to all the restaurateurs and chefs for the delicious eats.

Monday, March 7, 2011

Veggie Tacos


I'm a sucker for Mexican food. Like, big time. And while I really wouldn't call this "Mexican," it is INSPIRED by my favorite foods.

The night before I'd made this recipe, I had made some guacamole and shredded some cabbage for shrimp tacos. I think I've come to rely on different varieties of tacos as a quick, easy and tasty meal that you can really make any night of the week.

I used the guacamole I'd made, shredded cabbage, a few slices of lime I had left, and some salsa I'd bought. The only real "cooking" required were some onions I caramelized to put on top. SO GOOD. It killed two birds with one stone -- I got a yummy lunch, and I used up a lot of the stuff that was taking up space in my fridge. Enjoy!

Veggie Tacos
Makes 4 tacos

4 small flour tortillas
1/4 cup guacamole
shredded cabbage
shredded carrot
chopped tomatoes
fresh corn
black beans
1/2 cup sliced red onions
1 teaspoon sugar
1/2 tablespoon butter
1/4 cup sour cream
4 lime wedges

Heat the tortillas on a gas stove top or grill. Spread guacamole evenly on center of tortillas. Distribute the cabbage, corn, carrot, black beans, tomato and sour cream to your tastes.

In a skillet, melt the butter over medium heat. When melted and the pan is good and hot, toss in the onions and move them around. Let them cook, stirring every couple minutes, until they are translucent and beginning to brown. Sprinkle the sugar over the onions (to help along the caramelization) and let them cook, stirring every minute or so, for another five minutes.

Top the tacos with the onions, and then with your favorite salsa. Garnish with a lime wedge. Enjoy!


*Salsa: You can use any kind you prefer, or even make your own. May I suggest... this recipe if you're looking to make your own. If you want to save time and buy salsa... generally, I'm not a HUGE fan, or wasn't until recently. I don't like the texture and taste of most store-bought salsas, and then I discovered Frontera. The brand is actually that of Chicago restaurateur Rick Bayless (yes, that one!), and they really are super high quality. The tastes are unique and as soon as I tried them, I was hooked. The flavors I bought were Roasted Tomato and Tomatillo. They're available at most grocery stores, and totally worth the money.

Wednesday, February 9, 2011

Super Bowl Smorgasbord


I'd like to start this post off with a game recap... except that truthfully, I'm a little embarrassed to admit that I only watched the last 20 seconds or so. Not counting the Puppy Bowl, of course.

It's been a tradition for the last five years that on game day, I cook a BUNCH of junk food. Not "junk" by taste standard, but by health standards.

A lot of it is fried, greasy and features bacon as an ingredient (not that there's anything wrong with it). Delicious, but exactly what you'd call "health food."

This year was no exception. I made a TON of stuff. Some are my recipes, some are others' that I've gathered from around the web... they're all delicious and we've never been so grateful for leftovers (delicious food, and I don't have to cook!)

I've given credit below where credit is due. I highly recommend you check out the recipes -- I may not have eaten much but I tasted everything and I have NO complaints. Everyone for a Super Bowl party at my house next year?

The pork recipe is my own, the nachos recipe isn't. But you can't have pork nachos without the pork. I'll have to dish my pulled pork recipe in a later post, but if you don't know how to make it (or don't have the time), you could always substitute the pre-made pulled pork that you can find in the prepared meats section of the grocery store. It works just fine, and it's pre-seasoned and sauced.

Here's the pork...


Here's the pulled pork nachos.


The recipe for the nachos is courtesy of The Neelys (from the Food Networks). You can find it here. The only thing I did to change them was add some fried onion rings (see below) on top of the nachos. I will make these again and again and again -- so yummy!

Classic Buffalo Chicken Wings


These are so easy and so worth it and so delicious... and so not my recipe! I used this recipe from Chef Dennis' More Than a Mount Full blog. What I loved most was that the sauce he lists the recipe for has so much flavor. It's spicy, but not OH MY GOD hot. The reason is that it isn't just your standard hot sauce poured onto wings -- you first make a buffalo sauce using Frank's (or hot sauce of your choice -- I used Frank's Thick sauce for dipping, and it was perfect), butter and honey. The butter gives it a richness and the honey gives just a little bit of sweet that make these divine.

Call me crazy, but I also never realized that wings were supposed to be fried before you put sauce on them. Which explains why I don't make wings very often.

So delicious!

Buffalo Chicken Potato Skins


I have to say, after posting a picture of these on Twitter and Facebook, I must have gotten 10 messages from people asking me for the recipe!

The idea from this recipe came from this post from Sprinkle of Parsley, but I did change it up quite a bit to customize it (remember how I said I didn't want to eat much of these foods because they're not so healthy? I made a HUGE exception for this, and it was completely worth it).

I prepared the chicken and potatoes exactly as the recipe calls for, and the sauce I used was extra from the wings above (even if you're not making the wings, I highly suggest using the sauce recipe from it... it's got an awesome bite!).

I did skip the blue cheese, though, because I'm not a big fan, and used goat cheese in its place. After they came out of the oven, I added a little bit of crisped bacon (which I had crumbled) and topped each with a little bit of parsley.

Voila! Amazing.

Italian Bread and oil


I guess it's an Italian 'thing' to dip good crusty bread in oil. I often throw some roasted garlic cloves into the oil to give it even more flavor.

The bread is a recipe I found from All Recipes -- here it is. It's not difficult, but does take a little patience. Be prepared for it not to rise too too much, and generally (as you can see if you read the reviews) it took much less time in the oven.

You don't have to serve this with oil though, you could make a compound butter instead or rub the bread directly with garlic and have it that way. It's also a great crusty bread for soaking up leftover sauce. I've heard. Not that I've actually done that myself. Ever. Or once a week.

Either way, I had no idea it was so easy to make bread, and I'll definitely be doing it more!

Onion Rings
This is a little bone of contention. Well, more disappointment, really.

I had planned to serve these in two ways -- with some on top of the nachos, and some as a separate appetizer dish. That would have been great... had I not knocked the Pyrex dish of the second half of them off our counter mid-evening. Of course it smashed all over the tile floor, sending glass shards, flour and garlic powder everywhere.

We did have them on the nachos though, and they were very flavorful and tasty.

3 large onions, sliced into thin rings
4 cups of buttermilk*
1 tablespoon garlic powder
1 teaspoon salt
1 tablespoon paprika
1 tablespoon onion powder
3 cups flour
peanut oil

Place the onions in a 9x13 baking dish and cover with buttermilk. Let sit for 2 hours in the refrigerator.

Heat oil, enough to cover the bottom of the pan. Combine dry ingredients and dredge onion rings generously. Carefully place them into the oil, turning mid-way through to cook both sides. You will probably have to do this in 3 or 4 batches to avoid dropping the temp of the oil too much. Remove from oil and drain before serving.

*Note: I realized that I didn't have any buttermilk, but knew that was OK, because I had plenty of regular milk. If you need a buttermilk substitution, here's a simple fix: Measure just short of 1 cup of milk in a measuring glass. Add enough white vinegar or lemon juice (both work well) to get up to the 1 cup line. Let it sit for 5 minutes. You'll start to see the milk getting thicker and even a little clumpy. That's perfect. There's your buttermilk substitute!

Fried Mozzarella
Originally, I was inspired by this recipe from The Curvy Carrot. I had to substitute, though, because none of our grocery stores had bocconcini. Instead, I used slices of fresh mozzarella cheese, and it came out just beautifully. I just served this with some homemade arrabiata sauce, and he was a happy guy.

Decadent Chocolate Chip Mousse


Every good game needs a good finish. I knew that after the insanely rich (heavy) snacks I was making, I had to have an equally memorable dessert.

Who isn't a sucker for chocolate? So here's a very easy recipe I whipped up for him. I served it in martini glasses because I like to pretend I'm fancy (I'm not).

For the record, the reason it's called "chocolate chip" mousse but you don't see any chips listed... growing up, my sister and I were Dairy Queen-aholics and one treat in particular -- the chocolate chip blizzard. It wasn't even on their menu. All it consisted of was vanilla soft serve blended with chocolate sauce in a high speed mixer. What would happen is so simple, but so delicious... the chocolate would kind of coagulate -- basically chill -- into chunks inside the ice cream. The thing I always loved was the texture. It was chocolatey without being TOO chocolatey (truth be told, I'm more of a vanilla girl). So that's the texture I went for with this dessert. And I succeeded!

Decadent Chocolate Chip Mousse
12 ounces heavy cream
8 ounces of semi-sweet chocolate, melted but cooled
1 tablespoon cocoa powder

Whip the cream into stiff peaks, using a standing mixer or hand mixer. Slowly pour the melted chocolate in, blending each time. (Note -- it has to be cooled, or it will do weird things to the cream. Trust me.) Stop the mixer and use a plastic spatula to make sure the chocolate is evenly distributed. Add the cocoa powder and mix until it's completely incorporated.

Top with raspberries, Andes mints or any other adorable garnish. Serve cold.

Wednesday, January 12, 2011

Some days, you just need a cocktail

In case you've been under a rock for the past two days, we're getting a *hell* of a snowstorm here in New England.

First, they said 7-12 inches. Then 12-15. Then 15-18. 22 inches of snow later, I am paying children to do manual labor so I don't have to, and it's time for a cocktail.

This isn't anything special or fancy (especially because we haven't been able to leave the house in 24 hours), and I just used ingredients we had on hand. It's great tonight, but really would be great anytime.

It may be 20 degrees, it may still be snowing, we may have 20-something inches of snow on the ground, and baby, it's cold outside... but this cocktail will warm you right up.


Blizzard-tini
(1 shot/1 ounce vodka per person/serving)

1 ounce (or 1 shot) vodka
1 ounce pear juice
2 tablespoons cranberry juice
2 pieces of canned mandarin orange
1 tablespoon water
2 tablespoons granulated sugar

Tools
Cocktail shaker
Plate
Martini glass

In an ice tray, evenly divide water, cranberry juice and canned mandarin orange between 2 cube spots. Freeze for 3 hours or until solid.

Wet the edge of the martini glass and dip in sugar to frost the edges of the glass. You can also use juice in place of water.

Combine pear juice and vodka in cocktail shaker, and add ice cubes. Shake for 20 seconds, pour into glass.

Enjoy! :-)

Saturday, December 25, 2010

A new tradition?

A few weeks ago, I asked on Facebook if anyone had ever eaten Panettone. I have seen it everywhere in stores since my childhood, but as Italian as we are, no one in my family ever made or brought it to Christmas. For those unfamiliar with it, panettone is a tall, sweet, fruit-riddled Italian bread usually enjoyed at Christmas time.

Predictably, a lot of Italians responded that the had indeed had it and loved it. So I bought one for my Christmas party... and no one ate it. Oh well.

Rather than have it go to waste, I got creative. Since my family comes over to our house in the evening on Christmas Day, I thought I'd turn the panettone into a little dessert/comfort food treat -- bread pudding.

The verdict is still out -- they haven't arrived yet -- but if they like it (and if I like it!) I'll post the recipe tomorrow. If it is a success, who knows, maybe I'll have started a new tradition! In any event, here's a picture of my creation. Can't wait to try it.

*Update* We tried it and OMG. Delish! Even my dad, who said he "can't get bread pudding down" loved it. So the recipe is definitely forthcoming! Hurry out and get those panettone before they're all gone for the year!

Wishing you and yours the merriest of Christmases and the happiest of new years!

Cookie Swap -- We have a winner!

The winner of my "C is for Cookie, G is for Giveaway" contest to win a copy of Julia Usher's "Cookie Swap" is...


Danelle
of
Let's Dish!

Congratulations, Danelle!


Check out Danelle's blog, Let's Dish, where she posts her fabulous recipes. In fact, Let's Dish was the source of the Decadent Brownie Pie "Just Have to Share" post I did earlier this year.

Congrats again, Danelle. I hope it gives you some inspiration!

Thanks to everyone who entered!

Sunday, December 12, 2010

'C' is for 'cookie,' 'G' is for 'giveaway'!

It takes a heck of a lot for a book to make my mouth water.

The pictures must be enticing and vivid, the writing concise but descriptive, and the content... enthralling.

Take a look at Julia M. Usher's new book "Cookie Swap: Creative Treats to Share Throughout the Year" -- check, check and check.


The book -- 160 pages of pure DELIGHT -- is part cookbook, part guide to entertaining, all at its most elegant.

If you've ever found yourself in need of ideas for holiday or occasion cookies, look no further. Not only does Usher showcase beautiful ideas for seasonal treats, she lets you into her personal stash of recipes and tips for decorating cookies for any swap or event, from weddings, to baby showers, Halloween to Christmas, and everything in between.

One treat in particular that caught my eye -- the "Under Her Thumb(print) Cookies" will certainly be gracing my Christmas party this year. Not only is the recipe (like many in the book) easy and do-able even for cookie novices like myself, the finished product is beautiful and professional-looking with minimal effort required.

Julia has a fantastic website with tons of ideas, recipes (not just cookies!) and entertaining advice, and I highly recommend you check it out. You can visit her at http://www.juliausher.com.

In the past few weeks, I've blogged about how excited I am to be hosting my own swap with some of my amazing followers. In the spirit of giving, Julia sent me a copy of "Cookie Swap" to give away to one of my lucky readers!

Would you like to win a copy? Here's how!

Mandatory entry: Leave me a comment on this post telling me your favorite kind of cookie. Is it your mom's sugar cookies? Your own peanut butter? Grandma's oatmeal raisin? Tell me! Please be sure you include a valid email address so I can contact you if you’re the lucky winner! Please note – you do not have to be a blogger to win!

Extra chances to win – each is worth another entry. Please leave a separate comment for each extra...

- Follow Madame Menu on Google Friend Connect

- Become a fan of Madame Menu on Facebook

- Blog about this giveaway and link back to this post

- Tweet the giveaway (once a day -- leave a link to your status)

You can enter immediately, up through midnight PST on Wednesday, December 15, 2010. The winner will be chosen December 16th, 2010 -– via Random Integer Generator -- from all entries submitted, and notified immediately through email. I apologize to my non-US friends, but this giveaway is only open to all legal residents of the United States.

Christmas is almost upon us! Why not beautify your holiday table with some amazing new recipes from Julia? Enter now!

Monday, December 6, 2010

Reminder: Sign up for the cookie swap!

It's almost that time!


Hard to believe that we're already a week into December! Between Christmas parties and gift exchanges and shopping and decorating… it's all so much fun but time really does fly.

One of my favorite (who am I kidding -- everyone's favorite) parts of the holiday season is the food, especially the sweets.

As I announced a couple of weeks ago, to celebrate the season the best way I know how, I'm hosting a cookie swap. As much as I'd like to have you all over to my house, it'd get kind of expensive with airfare, so we're doing the swap through the mail. You don't have to bake a dozen cookies per person -- 3 or 5 or a dozen (if you wish!) is just fine. They can be any kind you like, be it gingerbread men (yes please), sugar (yes please), chocolate chip (yes please), or your own personal specialty. All I ask is that you include a recipe card with each package so people know exactly how you made your treats! I'll also be posting some very cute ideas from around the web for packaging and sending those cookies to make sure they get where they need to go in as few pieces as possible.

I will be partaking, and you can too! All you have to do is respond to this post or email me using the link above and let me know you'd like to participate. You do have to be in the US, and must be comfortable with others having your mailing address (not publicly -- I'll be keeping a spreadsheet of participants and it will only be available through me once it's time to send the cookies out).

You can sign up for the swap through the end of the day Thursday, December 9th. I want to make sure everyone has time to bake and send out their cookies before Christmas.

If you're not much the baking type, that's OK too. I'll be hosting a giveaway a little later this week, and potentially more before Christmas! Also, I'd appreciate if you were willing to RT this on Twitter (I'm @madamemenu) or repost it on Facebook so we can get as many people to share in the fun as possible.

Hope you'll be joining in!

Wednesday, November 24, 2010

Boozy Pumpkin Madeleines


Tomorrow is Thanksgiving, and as a last minute dessert, I decided to do something a little different. My husband and I are heading to my mother- and father-in-law's house for dinner, and I hate showing up empty-handed. Instead of the usual cookies or cake, I wanted to go a different direction, and since I'd recently bought a madeleine pan, I figured this was a good opportunity to try it out.

In case you're not familiar with madeleines, they're a spongy French butter cake. They're tiny (about cookie-sized) and look like shells. You need a special pan to make them, here's mine --


...which I assumed would be expensive, but I was able to buy off Amazon for just over $10.

Being that it's autumn and the perfect time of year for pumpkin, I decided to put a little New England fall twist on these, and flavor them with pumpkin. I also put a glaze on them just for a little extra sweetness (hence the "boozy" in the title), which you could skip, especially if you're making them for kids.


Boozy Pumpkin Madeleines
Makes 16

1/2 cup salted butter (1 stick), melted
2 eggs
1 cup flour
2 1/2 tablespoons canned pumpkin
1 teaspoon salt
1 teaspoon cinnamon
1/2 teaspoon nutmeg
1 tablespoon vanilla extract
1 teaspoon baking powder

For the glaze:
4 tablespoons sugar
2 tablespoons salted butter
1 tablespoon brandy
1 tablespoon canned pumpkin

Grease pan with butter and flour or Pam cooking spray, preheat oven to 375 degrees.

Melt the butter in a saucepan and set aside until completely cool.

In a mixing bowl, beat sugar, eggs and vanilla together. When combined, add pumpkin, cinnamon and nutmeg and mix until smooth -- there should be no visible chunks/lumps of pumpkin.

Pour in melted butter slowly, and mix to well-incorporate. Add flour 1/2 cup at a time, mixing just to incorporate each time. Do not overmix or the cakes will be too dense.

Spoon a heaping tablespoon of batter into each mold, careful not to overfill.

Bake for 12-15 minutes, or until tops and edges begin to turn golden brown.
Allow pan to cool before attempting to remove the cakes -- which should slide out easily -- or you WILL burn yourself! Set the cakes on a cooling rack.

For the glaze, melt butter and sugar together in a pan on medium-high heat, continually stirring. Once they are melted together, add brandy and pumpkin, and continue to cook until bubbly (about 3 minutes) and frothy. Set aside for 2 minutes for mixture to settle, then drizzle over the cakes.


Enjoy!

Monday, November 22, 2010

Make your holiday memories

Just taking a quick little break from the recipes to tell you about an awesome opportunity for bloggers!

Anyone who's been on the receiving end of almost any invitation from our family over the last few years is very familiar with Shutterfly.

We've used them for almost every creative project we've done since getting married three years ago… And I mean everything: We used our wedding photos and put together an album for ourselves and our parents (like these), and made Christmas cards with some of our wedding pictures on it to send to our guests.

Last year with the help of Shutterfly, cuteness in our house took on a whole new meaning. When our son was born in July 2009, we immediately turned to Shutterfly (and my newfound photography skills) to put together a photo-clad birth announcement, and we couldn't have been more thrilled with the results. We were able to include some precious pictures of our newborn, but also weren't forced to choose between photos or a cute design -- we got both!


Check out dozens of other adorable birth announcements here!

Then during the holidays, we turned Johnny's first time meeting Santa into a holiday card that our families still talk about (or, what we like to call, the cutest Christmas card in existence).


This past July, the little guy (not so little anymore) turned the big "1". To commemmorate the occasion, we found the perfect album-style birthday invitation for his party, and one still sits on our hutch in a frame today.


We love Shutterfly because their designs are clean, fresh and creative. Regardless of the product -- from photo albums to calendars, from mugs to photo enlargements -- Shutterfly has a variety to fit any style or budget.

This weekend, we took our son for his (now) annual Santa picture, and while the results weren't quite as angelic as last year, they will make for an equally memorable card. I won't be posting the photos until after we send out our cards, but I assure you, they are worth the wait. And of course, this year's memories will be captured on cards by Shutterfly.

To see some of the festive holiday cards at Shutterfly awaiting for your personal touch, click here! Can't wait to see what you come up with!

But besides cards, Shutterfly has tons of other products -- some of which I just discovered and OMG CALLING CARDS! -- to suit your holiday and every day needs.

Even better -- if you're a blogger and you love Shutterfly as much as we do, why not have 50 of your holiday cards ON THEM?

Click here for details!

Disclosure: I am receiving 50 holiday cards in exchange for this post. But trust me -- if I didn't REALLY love Shutterfly, I wouldn't have so many past projects to show off! :-)

Monday, November 15, 2010

New design and a big announcement!

First off, check out my new design! Isn't it fabulous? I am in love with it, and I hope you like it too. I can't take credit for this beauty though -- all the work was done by Jessica at The Frilly Coconut. She could not have been sweeter or more accommodating, and she got my design done in a week! If your blog is in need of a face-lift, I HIGHLY recommend Jessica! Please visit her!

Secondly, the holidays are upon us (sort of)! It's very hard for me to believe that Thanksgiving is next week, and we all know that as soon is that day is over, Christmas will be here before we know it.

So, in honor of my awesome new look, I wanted to announce something exciting...


Besides presents and trees, I know the first thing I think of when I think of the holidays is the food. So many parties, so many tidbits, so many desserts, and most importantly, so many delicious cookies!

To participate in the swap, you must be willing to commit to sending out containers of your cookies to other participants. You must be comfortable with others having your address (nothing will EVER be posted publicly. Until the it's time to start sending out the cookies, I will maintain the list privately) to send you your own stash.

The number of people who want to participate will dictate whether we'll send cookies to everyone or to a few selected people. In other words, if 20 people tell me they'd like to join the swap, I'm not going to make anyone send out 20 packages (unless they want to), I'll divide up the list into groups.

You don't have to be a blogger to participate, but it would be great if you participated in social media -- Facebook and/or Twitter -- and followed me on one or the other (not trying to limit the pool... just want to make sure I can know everyone and properly thank all the participants!). If you are a blogger, I would really love to see a post about the swap! It could be a recipe of the cookie(s) you sent out, or a rundown of what your received in return. All of the swaps I've ever done also asked that participants include a recipe of what they made in the package.

If you would like to participate, you can comment on this post, @reply me on Twitter, leave a post on Facebook or email me directly using the links on my header. Please let me know if you have a food allergy!

I would also appreciate any publicity, through a tweet or a post or anything in between! It would be great if you could take the image above and post it somewhere on your sidebar!

Looking so forward to tasting some of those delicious cookies!

Saturday, November 13, 2010

Heavenly Roasted Garlic


My family is loud.

When I was a kid, we would occasionally (for a birthday or no reason at all) go out to dinner all together -- me, my sister, our parents, my uncle, cousin, and our grandparents. We always had a blast.

The only trouble we ever had was finding a restaurant that could contain the GINORMOUS personalities seated (at least sometimes) at the table. My dad and uncle tell stories that cause uproarious laughter, my grandfather inevitably gets carried away joking around with our waitress (or waitressES -- we're what servers call "needy"), my grandmother and mom get into heated political discussions and too many desserts get ordered.

There were a few restaurants that could (would?) accommodate us, and while my sister and I didn't care where we went, we definitely had our favorites. One of which was a place in Mansfield, Conn., called Angellino's.

They served hearty Italian food and have HUGE portions. Their menu is a mix of classics, inventive and seasonal dishes, and has been for as long as I can remember. We never had a bad meal, and I've been back since childhood and it was just as good as it's always been.

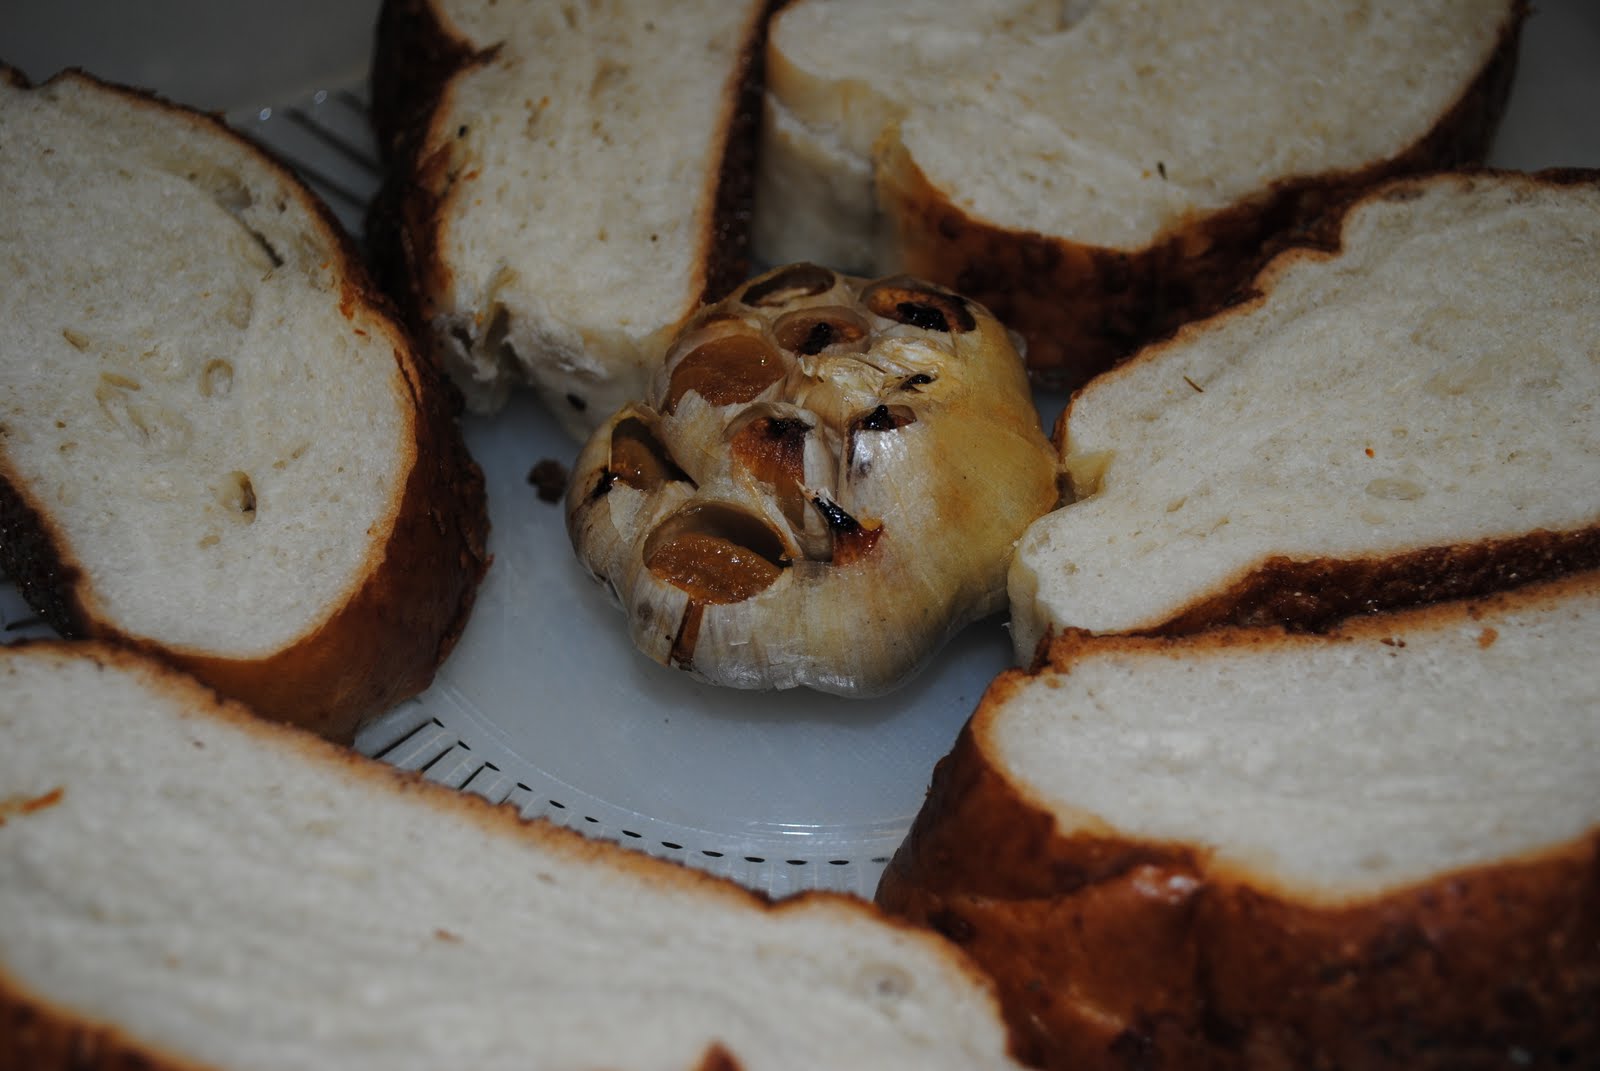
We'd pile in, check out the menu and order, and like many carb-craving Italians were just as excited for the bread basket to arrive at the table as we were for the main dishes. That's because Angellino's serves a special little gem with their bread -- fresh oven-roasted garlic.

I'm not talking about a little clove in your olive oil, I'm talking BIG TIME. An entire head of garlic was included with your bread. You'd take a slice of bread, use the spreader to finagle a clove out of the papery wrapping and smear it onto the bread in all its fragrant goodness. It was magical.

It goes without saying -- check any entree recipe on this blog -- that I am a huge fan of garlic. Raw, cooked, minced, chopped, powdered, doesn't matter. I love it all. But as hot as the tawdry love affair has been... I do realize that there are people who DON'T like garlic. I call them "traitors," but for the sake of inclusion, we'll call them anti-garlicites. I won't pretend I understand it, but I'll accept it.

This is something even anti-garlicites may enjoy. It's not that it doesn't TASTE like garlic, but it's not the same texture. The oven-roasting brings out a sweetness and full-bodied flavor that raw and even sauteed garlic doesn't usually have.

I concede that cooking with garlic can leave your hands smelling of the stuff for days. It can get under your fingernails and sting a little. If you burn it even slightly, the smell and taste of it are horrid. It can cause less-than-pleasant breath. On the other hand, it keeps vampires away. I digress.

What was so awesome about Angellino's roasted garlic was that as much as I had loved the flavor my entire life, I'd never seen it become spreadable. I had to figure out how to do it, and once I did, I couldn't believe how simple it was.

A head of roasted garlic goes great with Italian bread, on a focaccia, or with pita bread. I've even used it to flavor hummus before. It takes a little time but minimal effort, and it is so unbelievably worth it.

Preheat oven to 425. Take a large head of garlic and cut the top off, exposing the tops of all cloves (leave the paper on).


Sit in a large piece of aluminum foil, and crunch it up to form a little package.

Before pinching the top closed, drizzle about two tablespoons of extra virgin olive oil over the top of the garlic head. Seal up package and sit directly on oven rack.

Allow to roast for 45 minutes. Use caution when removing the package from the oven as the foil will be the same temperature as the oven -- definitely use tongs. Allow the package to sit somewhere and cool off for about 10 minutes. Unwrap, serve with bread and a spreader -- enjoy!

Wednesday, November 3, 2010

Pumpkin Fudge


This is a simple and fun treat to make on a weekend afternoon, especially if you do it on Halloween like I did. You get LOTS of fudge from it, and family and friends will be more than happy to help take it off your hands!

Pumpkin Fudge

Ingredients
1 cup canned pumpkin
1 teaspoon nutmeg
1 tablespoon vanilla extract
1 teaspoon salt
1 teaspoon ground cinnamon
3 tablespoons salted butter
1/2 cup brown sugar (light)
2 cups sugar
6 ounces evaporated milk
12 oz. white chocolate chips
7-ounce jar Fluff*

Tools
saucepan
9x9 pan

First, my assistant was working with me for this recipe -- he served as taste-tester later on and I assure you this exceeded his rigorous quality control standards. ;-)


Cover a 9x9 baking dish with foil. Doing a double layer will help make it easier to lift the fudge later. Press the foil into the corners as much as possible without tearing a hole.

Heat milk and sugar until they boil over low-medium heat. Stir from time to time to keep from scalding.

Add pumpkin, nutmeg, salt and cinnamon. Mixture should still be boiling. Carefully add Fluff, butter and vanilla -- be VERY careful, the sugar mixture could burn you if it splatters, and it will if you put spoonfuls of the fluff in from too high up. Try to stay as close to the saucepan as possible during this step. Once Fluff has been added, mix to combine -- this will take a minute or two, as it breaks down. Once smooth, cook, stirring frequently, for 25 minutes. Mixture will darken in color.

Remove from heat and add white chocolate. Stir continuously until all chips have melted. Some small pieces may remain, but most should have broken down.

Pour into 9x9 pan, and allow to set for 2 hours. Do NOT refrigerate or mixture will not set properly. Remove fudge from pan (once set, you should be able to overturn the pan onto a cutting board and have one large solid piece of fudge).


Cut into squares using a sharp knife to prevent crumbling, store between layers of parchment paper to avoid sticking. Fudge should be eaten within 4-5 days.


Notes
*Fluff: Fluff is the name brand of marshmallow creme. It was invented in Massachusetts, and I'm going to be elaborating on its many (delicious) recipe possibilities in a future post. I'm not sure if the brand name is available nationwide, but if it isn't, just look for a jar/container of "marshmallow creme" in the same section as peanut butter and jelly in the supermarket.

Thursday, October 14, 2010

Easy Chicken Cacciatore


Both my husband and I work full-time. We have a toddler (15 months today... woot!). We have a house, three cats, and an hour commute, each way, to and from work. So sometimes, I don't have the energy to be a gourmand.

I came up with this recipe because I almost always have the ingredients on hand, and because it only takes about half an hour from start to finish. I also tailored it to feed two because my son doesn't always eat what we do for dinner. The flavors are bold and it's the perfect quick and satisfying meal for two after a long day.

Easy Chicken Cacciatore
Serves 2
Prep time: 5 minutes
Cook time: 25 minutes

3/4 pound boneless chicken breast tenders, pounded thin
1/4 large onion, chopped
1 red bell pepper, chopped
2 tablespoons minced garlic
2 tablespoons extra virgin olive oil
1 teaspoon capers, with liquid
1 tablespoon shaved or shredded parmesan cheese
1 28-ounce can crushed tomatoes
2 tablespoons salted butter
1/2 teaspoon crushed red pepper
salt and pepper to taste

Chicken should be pounded into very thin filets. Season each side of chicken with salt and pepper.


Chop onions and pepper into approximately one-inch pieces (same size as they have about the same cooking time).


Heat oil in large pan/skillet. When hot, place chicken in pan. Turn after 2 minutes, toss in onions, peppers and garlic. Cook for 5 minutes.


Add tomatoes, capers, small amount of liquid from jar and butter, cover, allow to cook for 15 minutes. When finished, top with parmesan cheese and crushed red pepper and serve immediately.