Showing posts with label olive oil. Show all posts

Monday, October 11, 2010

Gamberi e mitili in brodo del vino (Shrimp and mussels in wine broth)

Growing up, I was willing to try pretty much anything, especially when it came to seafood.

My dad and I could have eaten some type of seafood everyday, and whatever he was having, I was having. I remember sitting down with him to share a lobster when I was about 8, just because I wanted to try it. I ate shrimp by the handful and steamers by the bucketload. If it was seafood, I was IN.

So as an adult at a restaurant, I'm instantly drawn to the seafood section of the menu. At a particular Italian eatery, my husband and I love a dish of mussels and broth. We end up eating it very quick and using our bread to soak up the buttery broth every single time.

But since we can't afford to go out to eat every night, I had to figure out a way to make the dish at home. And since mussels, while delicious, aren't all that filling as a dinner meal, I tossed in some shrimp. Next time I'd also like to add some scallops; I think they'd add even more flavor to the dish.

You can serve the broth separate like I did here, or pour it over the shellfish. I've done it both ways, but separated it here to show you what it should look like. I highly recommend serving this with some bread -- once you try the broth, you won't leave a single drop in the bowl.

Enjoy!


Gamberi e mitili in brodo del vino (Shrimp and mussels in wine broth)
Serves 4-6

2 pounds of live mussels (approximately 75 shells), scrubbed, debearded*
1 pound of peeled, deveined raw shrimp
3 tablespoons extra virgin olive oil
1/4 cup minced onion or shallot
4 tablespoons salted butter
2 tablespoons lemon juice
1 cup white wine
3 tablespoons garlic*
1 tablespoon garlic powder
salt and pepper to taste

Tools
wire/bristle brush
large sautee pan with lid

With sautee pan on medium heat, melt butter, then add lemon juice, salt, pepper and wine (carefully). Toss in onion and cook until translucent. Add half of the garlic to the broth and watch to make sure it doesn't burn. Cook until fragrant, about 3-4 minutes.


Toss mussels into pan, distributing as evenly as possible around the pan. Spoon remaining garlic and olive oil over shells and cover. Cook for 15 minutes.


Remove lid and toss shrimp on top of mussels, cover. Cook for additional 5 minutes or until shrimp turn pink. Remove from heat.


Spoon shrimp and mussels onto large platter.


Before serving, ensure all shells have opened -- discard mussels that remain closed. Top with broth from pan or serve with broth on the side (you can add any other flavors you like -- parsley, red pepper flakes, basil, etc., at this time).


Notes
Mussels -- At our supermarket, you can buy a 2 lb. bundle of mussels in the seafood department. Though it won't look like it at first, this is about 75 mussels.


The tricky thing about mussels, and the reason many people don't cook with them, is that they do require a fair bit of preparation. When you unbundle them, you have to scrub them, as they accumulate a fair amount of dirt/sand on their shells. Then, and if you're squeamish, look away -- you have to "de-beard" them. What's a beard you ask? It's a group of fibers the mussel has used to hold on to rocks in the ocean.


You have to grip the beard and yank it out of the shell. The creepy thing (for some, I'm past it!), is that as the mussel is live, you may feel it... "tug" back a little. Certainly, once you begin to pull the beard and let go, you will see a portion disappear back into the shell. In any event, you want to remove this beard, or as much of it as you can, because what you don't clean off the shells and out of them is going to end up in your mouth.


The other tidbit about mussels... you have to quite literally trust your gut. The LAST thing you want to eat is bad shellfish, and so you have to apply the open-closed theory of discarding the "bad" ones -- if you see shells OPEN before you cook the mussels, throw them out. If any remain CLOSED after you cook them, throw them out. If any shells have chunks mussing or exposed mussel showing, throw them out. Trust me on this one -- better safe than sorry!

Garlic -- Just to restate what I've said in almost every recipe I've made using garlic, you can feel free to use jarred or fresh garlic. I prefer to use the jarred as it keeps longer, I don't have to cut it up, and it seems to be more flavorful. If you use the jarred garlic, use 3 tablespoons. If you use fresh garlic, use 4-5 cloves, depending on their size.

Wednesday, August 18, 2010

Mom's Zucchini Pancakes


My mom will be the first to tell you she doesn't generally branch out too much with her cooking.

Off the top of my head, I can't remember more than maybe five or six dishes she made for dinner when I was a kid. It's not that her cooking was bad, because it certainly wasn't, but she stuck to the classics. She was on a budget and cooking for a picky husband (ew, cheese) and two picky daughters (ew, meatloaf) was no easy feat -- one of us wanted macaroni and cheese, the other chicken tenders, and my dad wanted beef stew.

But there was one thing the four of us could ALWAYS agree on -- mom's zucchini pancakes.

Though I haven't lived with my parents in some time, I can still remember the smell of them cooking. I can remember as a kid sitting and watching my mom make them, waiting for her to turn for a moment so we could swipe a fingerful of the delicious garlic batter. We couldn't have cared less that there were raw eggs in it -- it was amazing.

Mom and her two zucchini swipers. My sister Christina, left, mom in the middle, and I'm on the right.

The very idea of a "zucchini pancake" bothers some people. They think I'm talking about a literal pancake made of zucchini -- some breakfast food on fiber-filled steroids, but that's not it. Zucchini pancakes are savory and snacky and garlicky and delicious and all that is good and right with the world. They were different than the kind you'd read about in a cookbook or see on a Food Network show. For one, the zucchini was never shredded but diced, and my mom's had a distinctly souffle-like texture because of the amount of egg in them. Mix it with garlic and seasoned breadcrumbs, and you'd end up with a WHOLE lot of delicious.

For years, I've asked my mom for her zucchini recipe. It wasn't that she ever hesitated to give it to me, but she kind of just... couldn't. She didn't measure when she cooked, and she could give me her best estimation, but that was it. Until this weekend.

While visiting this weekend, my mom brought me a batch of her zucchini pancakes -- I may be 25, but to my parents, I'm basically still in college, and they're still responsible for feeding me.

While she was at my house, I told her I wanted to blog her recipe and she FINALLY was able to give me at least close approximations so that you too can enjoy them in your home. So here it is, after many, many years spent trying to pin it down -- my mom's (very short and very easy) zucchini pancake recipe.

Mom's Zucchini Pancakes
Yield is approximately 30 5-inch cakes

1 large zucchini, diced into half-inch pieces
2 tablespoons garlic powder
1 yellow onion, diced
9 eggs
1 cup Italian seasoned bread crumbs
1/4 cup parmesan cheese
salt and pepper
1 cup olive oil

Combine eggs, parmesan cheese, garlic powder and bread crumbs. When well combined, add zucchini and onion.

In a frying pan, heat 3-4 tablespoons olive oil on medium high heat. When fully heated, ladle mixture into hot olive oil. Three or four pancakes can be cooked in oil at once.

When oil is dried up, pour enough to cover the bottom of the pan and repeat ladeling process. In my mom's estimation, you will need to add oil before every other batch.


Enjoy!

Sunday, August 8, 2010

Recipe #26: Shrimp Scampi

This recipe is what my husband calls "an Amy classic." No one ever taught me how to make it -- in fact not a lot of the people in my family actually like seafood -- it's just something I love and can do well. I made it for my sister last summer, and it got rave reviews. (Chrissy, let me know when, and I'll make it again! :))

Enjoy -- hope it becomes one of your classics as well!


Shrimp Scampi
Cooking time: About 25 minutes
Serves 2-3

Ingredients
8 ounces dry spaghetti (half a regular-sized box)
2 tablespoons butter
1 tablespoon extra virgin olive oil
8 ounces peeled, devained raw shrimp*
¼ cup grated parmesan cheese
1/3 cup white wine*
2 cloves garlic, finely minced
2 tablespoons lemon juice
½ shallot
Salt to taste, additional to salt pasta water
½ cup reserved pasta water*
1 teaspoon garlic powder
1 teaspoon onion salt
¼ cup chopped tomatoes (optional)

Tools
Large skillet or non-stick pan
Large pasta pot

Fill pasta pot with water, and add generous amount of salt. Prepare pasta as directed, drain in colander, reserving ½ cup of the salted water pasta cooked in. Do not rinse! While pasta is cooking…

Heat butter in large skillet or non-stick pan on medium heat. Toss shallots into butter, and cook until translucent. Add olive oil and garlic, and turn down heat to medium-low to avoid burning garlic. Add shrimp* and allow to cook for 2 minutes. Turn in pan to cook on both sizes. Add white wine*, lemon juice, garlic powder and onion salt and cook until shrimp are pink and no longer translucent. Toss with half of the parmesan cheese. If using tomatoes, add them now and allow to cook for a minute or two.


Once pasta is drained, add to pan with scampi, and pour in reserved pasta water.


Top with remaining cheese, toss with sauce to evenly coat. Serve immediately.


Comments
*Frozen shrimp: Please use whatever size shrimp are available to you. I hate recipes that specify sizes. Generally, I don’t use anything below 16-20 count, but it’s totally up to you, and if you’re making this more budget-friendly… use what’s on sale.

*White wine: You can use any type of white wine for this recipe. I prefer chardonnay, because if I drink wine, it’s my preferred variety. I wouldn’t cook with a wine I wouldn’t drink. You don’t have to spend $30 on a bottle, or even $20, but I would avoid the $3 shelf.

*Pasta water: As you read that, you might wonder why I ask you to reserve and use some of the water the pasta has been cooked in. I do have a reason. Adding pasta water lends a starchiness and flavor that you can’t get from regular water, and adding it to the scampi cuts the butter/oil texture from this recipe, so you aren’t left with half an inch of oil in the bottom of your pan. Just trust me on this one.

Note: You’ll see some of these pictures have tomatoes in them while some don’t. My husband refuses to eat his scampi with tomatoes. Loathes it. I have no idea why, since I’ve been eating tomatoes every which way since I was a kid. So the tomato-less scampi is my husband’s while the tomato-full scampi is mine.

Wednesday, March 17, 2010

Recipe #21: Garlic Knots

If you don't LOVE garlic, don't read any further. This recipe isn't for the faint of heart (or breath). You WILL smell like garlic after you eat these. This is a quick, cheap and easy recipe, and I can assure you -- as can my husband -- that these garlic knots are delicious. One other warning though, you will definitely get your hands dirty, so keep some dish soap nearby. Aside from the dough (which you can buy or make, if you have a favorite pizza dough recipe) most of these ingredients are likely things you already have in your refrigerator and spice cabinet. They're a quick appetizer and an alternative to regular bread with pasta. Enjoy!

Garlic Knots
Prep time: 10 minutes
Cooking time: 20 minutes

Ingredients
pre-made store bought pizza dough
1/2 cup plus 1 tbsp minced garlic*
6 tbsp butter, melted (30 sec. in microwave in glass measuring cup)
1 tbsp garlic powder
1/2 tbsp onion salt
1 tbsp extra virgin olive oil
1/4 cup grated parmesan cheese
pinch salt
pinch dried parsley
marinara sauce for dipping (optional)


Tools
parchment paper
baking sheet pan
glass measuring cup
mixing bowl
barbecue brush or spoon

Preheat oven to 325 degrees. Roll/press pizza dough into a 9x12 rectangle (approximate).


To measuring cup of melted butter, add garlic powder, salt, olive oil, onion salt, parsley. Mix until combined. Using either spoon or brush, spread about 3/4 of butter mixture evenly onto dough. Distribute 1/2 cup of garlic on top of dough.


Cut dough into six strips of about the same size.


Tie each one into knots repeatedly until untied edges are no longer than one inch. Place each knot into mixing bowl, and when all six are tied, pour remaining butter mixture over them, and toss to evenly coat. Sprinkle with parmesan cheese. Cover baking sheet in parchment paper. Place knots on parchment paper, and top each with a small amount of remaining garlic.


Bake at 325 for 20 minutes or until golden brown. Remove and let cool. Serve alone or with a side of marinara sauce.


Comments:
-Garlic: You have seen me post many times that I don't use fresh garlic when I cook, unless it's going to be almost raw in the dish. What I use instead is a huge jar of Spice World minced garlic. It saves me the time of having to chop (and have my hands smell like) garlic for any given recipe. Using this type of jarred garlic is highly recommended for this recipe. It has a slightly bitterness to it that gives a great flavor to the knots.

Saturday, February 27, 2010

Recipe #20: Tuscan Chicken and Veggie White Pizza with Feta

I love making homemade pizza (see my first recipe as proof). Nothing against take-out pizza once in a while, but something about homemade pizza is just plain better. You can top it with whatever you like, as much or as little, throw any crazy toppings you like in and don't have to worry about tipping a delivery guy.

As part of the Foodbuzz Tastemakers program, I received some free products from Bertolli -- a jar each of their Four Cheese Rosa and spicy Arrabbiata (pretty sure the translation is "cannot wait to use in a recipe") sauces. Normally, I'd do a red sauce with pizza, but this time I decided to shake things up and do a white pizza with the Four Cheese Rosa sauce. Though I normally shy away from jarred sauces as I like the purer flavor you get from making your own, I foresee a stocked pantry of Four Cheese Rosa in our future.

I used my pizza stone for this recipe, but you can also bake the pizza on a cookie sheet. Just be sure to drizzle with olive oil, make sure it's nice and hot, and coat with cornmeal. In case you do use a pizza stone, I've included my pizza stone maintenance tips at the bottom of the recipe.

Before I delve into my recipe, I just have to say that besides the taste, Bertolli impressed me in another way -- their serious packaging. Talk about intense, and beautiful at the same time.

The outside of the box is meant to resemble a menu...


...while the inside has cleverly-designed spaces for the sauces and offers a sample menu of ways they can be used.


Honestly, Bertolli -- bonus points for presentation. Now, onward with the recipe! Enjoy!

Ingredients
3 roma tomatoes
5 cloves of garlic, minced*
1 12-ounce jar marinated artichoke hearts
1/2 cup Bertolli Four Cheese Roma sauce
4 ounces grilled chicken breast*
1 cup feta cheese
2 tbsp extra virgin olive oil
1/2 tsp sugar
1/2 cup cornmeal
premade refrigerated pizza dough*
salt and pepper to taste

Tools
pizza stone (optional)
2 cookie sheets or 1 sheet pan and a loaf pan

Prep: Chop artichokes into one inch sections. Grill chicken (season with salt and pepper) until cooked through; separate into smaller pieces. Set both aside.

Preheat oven to 450 degrees. (If using pizza stone, allow stone to sit in hot oven while preheating, up to 45 minutes) Slice tomatoes into three our four half-inch slices each. Place in loaf pan or on cookie sheet, drizzle with olive oil, sprinkle with salt, pepper and sugar and top with two cloves of minced garlic. Bake for 15 minutes.

Before:


After:


Stretch pizza dough to desired shape (I went for a rectangle that ended up being about a foot long). Coat pizza stone or baking sheet with cornmeal, to prevent stickage and give pizza a restaurant taste and feel.


Place untopped dough into the oven for 5 minutes to rise slightly. Remove from oven and carefully pierce with fork.*

Top pizza first with Four Cheese Rosa sauce, distributing evenly, but leaving area for crust. Top next with remaining minced garlic, then chicken, next tomatoes, artichokes, and finally, crumble feta over the top.


Bake at 450 for 20-25 minutes, or until crust is golden brown and cheese has browned. Allow to cool for 15 minutes before serving.


*Comments:

-Garlic: I don't usually use fresh garlic when I cook, unless it's going to be almost raw in the dish. What I use instead is a huge jar of Spice World minced garlic. It saves me the time of having to chop (and have my hands smell like) garlic for any given recipe. For this recipe, if you use the jarred garlic, use three tablespoons (one for the tomatoes, the remaining two for the pizza).

*Chicken breast: I literally took about four ounces of boneless, skinless chicken breast tenders, seasoned with salt and pepper and stuck it on the grill. Once it was slightly charred, I removed it and broke it into smaller pieces. No fancy techniques here.

*Pizza dough: The type of dough I used for this is not the type you can roll out from Pillsbury, but the type usually sold in the dairy section in plastic bags. The amount of pizza you'll end up with obviously depends on how much you buy, but with a typical bag from the grocery store, I can usually get about 8 pieces of pizza. If your local store doesn't have that, that's OK. You can use Pillsbury pizza dough (it comes in the same type of container as crescent rolls). Just know that you'll have to do much less stretching and much more rolling to avoid breaking the dough. Also, the reason I slightly bake the crust before topping it is to avoid ending up with a crust that's not cooked on the bottom or in the middle because I loaded it with too many toppings when it was raw.

*Pizza stone: Oh, pizza stone, what a mystery you are. If you don't have a pizza stone -- a round terra cotta stone that can be heated to very high temperatures to give food a crisp -- that's okay. For this, you can use parchment paper on a cookie sheet, but you may need to slightly adjust the cooking temperature and time for whatever the parchment paper degree limit is. If you have a pizza stone and (like me) hadn't used it until recently, here are a few things you should know.

*Always let your pizza stone stay in the oven "baking" for about half an hour to 45 minutes before adding food to it. Otherwise, the stone can break if it's subjected to too much heat too quickly. Not allowing it to preheat can also cause whatever you cook on it to stick. In this case, sprinkle additional corn meal on the stone before you put the dough on it.

*Double up on the pot holders. You'll burn your hands very, very easily if you attempt to grab a 450-degree inch of terra cotta. Do yourself (and your fingerprints) a favor, and use two. Before you take the stone out of the oven to place whatever you plan to cook on top of it, make sure you have a plan for where you'll set it down to do that. You don't want to end up melting whatever you set it down on.

*Don't worry if pesto or oil gets onto the stone. That's actually good. The more oil bakes into the stone, the more "seasoned" and "weathered" it is for baking.

*Don't wash your pizza stone with soap. If you do, it will have the same effect as if you dumped oil all over it -- you'll be tasting Palmolive in all your foods from now on. Just use cold water, and let the stone cool completely (even overnight) before "washing."

Monday, September 21, 2009

Recipe #7: Goat Cheese and Sundried Tomato Spread

This is one of my all-time favorite foods, and it really only requires buying three things -- goat cheese, a jar of sundried tomatoes, and a good loaf of crusty bread. I can't take credit for the idea completely; a restaurant in Connecticut that we sometimes go to for special occasions has a goat cheese with sundried tomatoes appetizer. I've never asked them how they work their magic to make it so delicious, but I bought the ingredients, gave it a shot, and while it's a little different... I love it. Please note -- wherever you see a (*) next to an ingredient or tool, there is a comment about it below the recipe. Enjoy!

Goat Cheese and Sundried Tomato Spread

Prep time: 5 minutes

Ingredients
1 11 ounce package of goat cheese*
1/4 cup sundried tomatoes packed with herbs in olive oil*
1 1/2 tablespoons marinating oil from jar of tomatoes
1 loaf of crusty bread

Tools
food processor
spreader (for serving)

Cut goat cheese into four pieces and place in food processor with tomatoes and one tablespoon of marinating oil. Set on puree for approximately 10 seconds, or until goat cheese is creamy and whipped in texture. There should be no visible lumps. Add remaining oil and pulse til well combined (dip should be light orange-pink in color). Yields approximately 1 1/2 cups.


Serve with a few sundried tomatoes along with small slices of bread.


*Comments:
-Goat Cheese: Make sure whatever you buy does NOT have herbs in it. This completely changes the taste and in my opinion, makes the cheese taste... well, un-goat-cheese-like. This is what I always buy, and it's available at any supermarket:


-Sundried tomatoes: The complete opposite of my commentary on herb-packed cheese... I actually only use the sundried tomatoes that are in oil and packed with herbs for this recipe. The oil really brings out the flavor of the tomatoes and the herbs make it so you don't have to add anything spice-wise. The type I buy is pictured below, but any herb-marinated sundrieds will due. Word to the wise -- if you use these for this, you won't use the entire jar. They can then be stored in the fridge till you need them again. But, when you take them out again, the oil will have hardened. To remedy, microwave for 50 seconds. Word to this wise -- this comes at the advisement of my husband -- remember to take the metal lid off BEFORE microwaving!


Enjoy!

Sunday, August 30, 2009

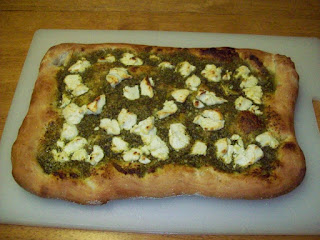
Recipe #1: Pesto Pizza With Goat Cheese

I love using pizza dough from the grocery store to create a bunch of different kinds of pizzas. The pizza below is one I've made a few times, and it just gets better every time. Please note -- wherever you see a (*) next to an ingredient or tool, there is a comment about it below the recipe. Enjoy!

Pesto Pizza with Goat Cheese

Cooking time: 12-15 minutes

You'll need:

Ingredients
2 cups basil leaves
6 cloves of garlic, chopped*
1/2 cup extra virgin olive oil
1/2 cup grated Parmesan cheese
2 tablespoons of pine nuts*
1/2 cup cornmeal
5 1/2 ounces goat cheese
Salt and pepper to taste
Premade pizza dough*


Tools

food processor
pizza stone*
paddle or large cutting board to transfer dough to stone
spoon


To prepare pesto: If pine nuts are whole, add them to the food processor before any other ingredients and pulse until finely chopped. Add basil, garlic, 1/4 cup parmesan cheese. Put lid on processor, and pulse, slowly adding 1/4 cup olive oil. When well-blended, add remaining parmesan cheese and remaining olive oil, continue to pulse. Remove lid, add salt and pepper to taste. Set pesto aside. Yields 1 cup.


Preheat oven to 450. Use 1/4 cup cornmeal to sprinkle on surface where you'll be preparing the pizza. Stretch pizza dough into a rectangle or square. Size will depend on dough purchased, but dough should be no more than 1/2 inch thick in center and 3/4 to 1 inch thick for crust. Use spoon or brush to apply 3/4 cup pesto to dough, leaving an inch around the edges for crust. With hands, crumble goat cheese onto pesto.


Place onto pizza stone into 450-degree oven for 12-15 minutes until crust is raised and golden brown, and cheese is slightly browned. Serve!


*Comments:

-Garlic: I don't usually use fresh garlic when I cook, unless it's going to be almost raw in the dish. What I use instead is a huge jar of Spice World minced garlic. It saves me the time of having to chop (and have my hands smell like) garlic for any given recipe. For this recipe, if you use the jarred garlic, use two tablespoons.

-Pine nuts: Sometimes, these are also called Pignoles. I can usually find them either in the produce section, or in the 'international foods' aisle at the store. If your store doesn't carry them, you can substitute walnuts for pine nuts in this recipe.

-Pizza dough: The type of dough I used for this is not the type you can roll out from Pillsbury, but the type usually sold in the dairy section in plastic bags. The amount of pizza you'll end up with obviously depends on how much you buy, but with a typical bag from the grocery store, I can usually get about 8 pieces of pizza.

-Pizza stone: Oh, pizza stone, what a mystery you are. If you don't have a pizza stone -- a round terra cotta stone that can be heated to very high temperatures to give food a crisp -- that's okay. For this, you can use parchment paper on a cookie sheet, but you may need to slightly adjust the cooking temperature and time for whatever the parchment paper degree limit is. If you have a pizza stone and (like me) hadn't used it until recently, here are a few things you should know.

*Always let your pizza stone stay in the oven "baking" for about half an hour to 45 minutes before adding food to it. Otherwise, the stone can break if it's subjected to too much heat too quickly. Not allowing it to preheat can also cause whatever you cook on it to stick. In this case, sprinkle additional corn meal on the stone before you put the dough on it.

*Double up on the pot holders. You'll burn your hands very, very easily if you attempt to grab a 450-degree inch of terra cotta. Do yourself (and your fingerprints) a favor, and use two. Before you take the stone out of the oven to place whatever you plan to cook on top of it, make sure you have a plan for where you'll set it down to do that. You don't want to end up melting whatever you set it down on.

*Don't worry if pesto or oil gets onto the stone. That's actually good. The more oil bakes into the stone, the more "seasoned" and "weathered" it is for baking.

*Don't wash your pizza stone with soap. If you do, it will have the same effect as if you dumped oil all over it -- you'll be tasting Palmolive in all your foods from now on. Just use cold water, and let the stone cool completely (even overnight) before "washing."

Enjoy, and let me know if you have any questions!