Showing posts with label dessert. Show all posts

Saturday, December 25, 2010

A new tradition?

A few weeks ago, I asked on Facebook if anyone had ever eaten Panettone. I have seen it everywhere in stores since my childhood, but as Italian as we are, no one in my family ever made or brought it to Christmas. For those unfamiliar with it, panettone is a tall, sweet, fruit-riddled Italian bread usually enjoyed at Christmas time.

Predictably, a lot of Italians responded that the had indeed had it and loved it. So I bought one for my Christmas party... and no one ate it. Oh well.

Rather than have it go to waste, I got creative. Since my family comes over to our house in the evening on Christmas Day, I thought I'd turn the panettone into a little dessert/comfort food treat -- bread pudding.

The verdict is still out -- they haven't arrived yet -- but if they like it (and if I like it!) I'll post the recipe tomorrow. If it is a success, who knows, maybe I'll have started a new tradition! In any event, here's a picture of my creation. Can't wait to try it.

*Update* We tried it and OMG. Delish! Even my dad, who said he "can't get bread pudding down" loved it. So the recipe is definitely forthcoming! Hurry out and get those panettone before they're all gone for the year!

Wishing you and yours the merriest of Christmases and the happiest of new years!

Wednesday, November 24, 2010

Boozy Pumpkin Madeleines


Tomorrow is Thanksgiving, and as a last minute dessert, I decided to do something a little different. My husband and I are heading to my mother- and father-in-law's house for dinner, and I hate showing up empty-handed. Instead of the usual cookies or cake, I wanted to go a different direction, and since I'd recently bought a madeleine pan, I figured this was a good opportunity to try it out.

In case you're not familiar with madeleines, they're a spongy French butter cake. They're tiny (about cookie-sized) and look like shells. You need a special pan to make them, here's mine --


...which I assumed would be expensive, but I was able to buy off Amazon for just over $10.

Being that it's autumn and the perfect time of year for pumpkin, I decided to put a little New England fall twist on these, and flavor them with pumpkin. I also put a glaze on them just for a little extra sweetness (hence the "boozy" in the title), which you could skip, especially if you're making them for kids.


Boozy Pumpkin Madeleines
Makes 16

1/2 cup salted butter (1 stick), melted
2 eggs
1 cup flour
2 1/2 tablespoons canned pumpkin
1 teaspoon salt
1 teaspoon cinnamon
1/2 teaspoon nutmeg
1 tablespoon vanilla extract
1 teaspoon baking powder

For the glaze:
4 tablespoons sugar
2 tablespoons salted butter
1 tablespoon brandy
1 tablespoon canned pumpkin

Grease pan with butter and flour or Pam cooking spray, preheat oven to 375 degrees.

Melt the butter in a saucepan and set aside until completely cool.

In a mixing bowl, beat sugar, eggs and vanilla together. When combined, add pumpkin, cinnamon and nutmeg and mix until smooth -- there should be no visible chunks/lumps of pumpkin.

Pour in melted butter slowly, and mix to well-incorporate. Add flour 1/2 cup at a time, mixing just to incorporate each time. Do not overmix or the cakes will be too dense.

Spoon a heaping tablespoon of batter into each mold, careful not to overfill.

Bake for 12-15 minutes, or until tops and edges begin to turn golden brown.

Allow pan to cool before attempting to remove the cakes -- which should slide out easily -- or you WILL burn yourself! Set the cakes on a cooling rack.

For the glaze, melt butter and sugar together in a pan on medium-high heat, continually stirring. Once they are melted together, add brandy and pumpkin, and continue to cook until bubbly (about 3 minutes) and frothy. Set aside for 2 minutes for mixture to settle, then drizzle over the cakes.


Enjoy!

Wednesday, November 3, 2010

Pumpkin Fudge


This is a simple and fun treat to make on a weekend afternoon, especially if you do it on Halloween like I did. You get LOTS of fudge from it, and family and friends will be more than happy to help take it off your hands!

Pumpkin Fudge

Ingredients
1 cup canned pumpkin
1 teaspoon nutmeg
1 tablespoon vanilla extract
1 teaspoon salt
1 teaspoon ground cinnamon
3 tablespoons salted butter
1/2 cup brown sugar (light)
2 cups sugar
6 ounces evaporated milk
12 oz. white chocolate chips
7-ounce jar Fluff*

Tools
saucepan
9x9 pan

First, my assistant was working with me for this recipe -- he served as taste-tester later on and I assure you this exceeded his rigorous quality control standards. ;-)


Cover a 9x9 baking dish with foil. Doing a double layer will help make it easier to lift the fudge later. Press the foil into the corners as much as possible without tearing a hole.

Heat milk and sugar until they boil over low-medium heat. Stir from time to time to keep from scalding.

Add pumpkin, nutmeg, salt and cinnamon. Mixture should still be boiling. Carefully add Fluff, butter and vanilla -- be VERY careful, the sugar mixture could burn you if it splatters, and it will if you put spoonfuls of the fluff in from too high up. Try to stay as close to the saucepan as possible during this step. Once Fluff has been added, mix to combine -- this will take a minute or two, as it breaks down. Once smooth, cook, stirring frequently, for 25 minutes. Mixture will darken in color.

Remove from heat and add white chocolate. Stir continuously until all chips have melted. Some small pieces may remain, but most should have broken down.

Pour into 9x9 pan, and allow to set for 2 hours. Do NOT refrigerate or mixture will not set properly. Remove fudge from pan (once set, you should be able to overturn the pan onto a cutting board and have one large solid piece of fudge).


Cut into squares using a sharp knife to prevent crumbling, store between layers of parchment paper to avoid sticking. Fudge should be eaten within 4-5 days.


Notes
*Fluff: Fluff is the name brand of marshmallow creme. It was invented in Massachusetts, and I'm going to be elaborating on its many (delicious) recipe possibilities in a future post. I'm not sure if the brand name is available nationwide, but if it isn't, just look for a jar/container of "marshmallow creme" in the same section as peanut butter and jelly in the supermarket.

Sunday, October 10, 2010

Pumpkin ice cream and affogatos


I have a confession to make: As much as I enjoy laying out in the sun and getting (my VERY LIGHT shade of) tan, as much as I enjoy my hair being blonde, as much as I enjoy the heat... I adore the fall.

Having grown up in New England, I was born and bred with an addiction to autumn. I love the sights, the sounds, and the tastes of fall. So naturally once the calendar page flipped to October, I ran right to the store and picked up one of the most classic fall flavors -- pumpkin.


I wanted to do something different with the pumpkin besides the standard pumpkin bread or pumpkin roll, so I decided to go in a different, chillier direction with ice cream. To take the fall flavor even deeper, I went with an affogato, made with cinnamon Starbucks coffee.

Before about two years ago, I'd never heard of an affogato. I tried one on our trip to the Berkshires, and was instantly in love. "Affogato" is Italian for "drowned," and this ice cream treat is literally drowned in espresso. In place of espresso, I used coffee, but trust me -- it may sound odd, but once you combine the raw coffee flavor with the sweet creaminess of the ice cream... yum. You won't regret it.

Enjoy!

Pumpkin Ice Cream and Affogatos
Yields about 10 half-cup servings

Ice cream

1 1/2 cups heavy cream
1 cup whole milk
1 vanilla bean (pod and beans)
1 egg
1 teaspoon salt
1/4 teaspoon cinnamon
1/2 teaspoon nutmeg
1/2 15-ounce can of pure pumpkin
1/2 cup granulated sugar
1/3 cup brown sugar

Affogato
Starbucks cinnamon coffee
cinnamon stick (garnish)

Tools
Cuisinart ice cream maker
medium saucepan
mixing bowl
glass bowl (for chilling)

In saucepan, combine milk and cream. Cut open vanilla bean, toss seeds into cream mixture. Once seeds are removed, add pod to mixture. Heat cream on medium-low for 30 minutes and remove from heat.


In separate mixing bowl, combine egg, pumpkin, sugars, salt, cinnamon, nutmeg, salt and sugars. Beat with whisk until smooth.


Using a ladle or spoon, add a small amount of the heated cream to the pumpkin mixture. Mix until combined, then add another spoonful. This will temper the mixture so the egg doesn't scramble when exposed to heat.


Pour all of the pumpkin mixture into the saucepan with the cream, and mix until smooth. Pour into glass bowl, and allow to cool completely in the refrigerator for at least 4 hours, up to overnight. At the same time, place bowl of ice cream maker into the freezer -- the liquid in the bowl (what chills the ice cream) must freeze before ice cream can be made.


Once bowl is frozen, assemble machine and turn switch to on. Pour cream mixture into bowl and allow to mix for 25-30 minutes or until desired texture is reached.


You can freeze the mixture for longer if you want firmer ice cream.


To create affogatos, scoop some ice cream into a glass, and top with prepared coffee. Garnish with cinnamon stick. Enjoy!


Notes:
Vanilla bean -- This is the first time I've ever actually used a REAL vanilla bean for flavoring. I'm not going to lie, they aren't cheap -- for this ONE in a jar, it was $7.49 at the grocery store -- but they are so worth the flavor.


In case you've never seen a vanilla bean pod cut open, here's what the inside, complete with itty-bitty seeds intact looks like.

Thursday, March 18, 2010

Recipe #22: Bellini Squares

I love peaches. They're not only tasty fresh, but good in almost any form -- frozen, fruit cup, even grilled are delicious. But my love for peaches grew even more the first time I tried a bellini -- a drink made of champagne and peach puree. Though they're not practical all the time (doesn't really go so well with pizza) and are more of what I think of as a brunching drink, you could certainly enjoy one alongside these squares.


Ingredients
5 peaches
1 tbsp sugar
2 tablespoons champagne*
1 pkg prepared sugar cookie dough*
1 jar caramel or butterscotch sauce*
1/2 cup chopped pecans

Tools
food processor
very well-greased 9x12 baking pan*

Using a rolling pin and your hands, spread cookie dough inside 9x12 pan.


Bake as directed on package. Allow to cool for 20 minutes when finished.


After cookie has cooled, dice two peaches and place in food processor with sugar. Pules 3-4 times, then add champagne (this will bubble and fizz at first, wait a second until bubbles go away) and puree. Spread mixture evenly over cookie.


Slice remaining three peaches into 16 pieces each (half, then quarter, then slice into 4) and place on top of peach puree in any pattern. Top with drizzled caramel mixture and nuts.


Chill for 30 minutes to set caramel, and cut into squares.


Comments:
-Champagne: If you can't find actual champagne, or don't want to pay for it, feel free to use any kind of sparkling wine in its place. If you don't drink, or want to share this dessert with tots, you can even use Martinelli's Sparkling Cider instead.

-Sugar cookie dough: I used to 'tube' variety for this, and I only used one. If you wanted a thicker cookie, you could use two, but baking times would vary. I wouldn't recommend using the breakapart dough for this, as the texture seems different than the tube variety (at least to me), and the taste of those is almost playdough-like (I mean, not that I'd know what playdough tastes like).

-Caramel or butterscotch sauce: Instead of using the jarred kind, I actually made my own for this recipe. The reason I recommend the jarred type -- and the kind I'm talking can usually be found with other sundae toppings at the grocery store -- is because of how finicky sugar can be when making caramel. You heat it too little, you end up with a gummy mess; you heat it too much, and you end up with brittle. Using the jarred type ensures you'll have a smooth, sticky caramel. BUT, If you know how to make your own (better than I can, obviously), feel free!

-Baking pan: I used a baking dish, the type you'd make brownies in, for this recipe, but I'd bet you could even use a cookie sheet. Lining the sheet with parchment paper would make it even easier.

-Peach puree: I hesitate to call this jelly or jam, but the texture of this once it's all done in the food processor, is that of marmalade. If you have extra and don't want as thick of a layer as I used, you could certainly save some and put it on toast as a breakfast treat or even top ice cream with it. : )

Enjoy!

Monday, January 25, 2010

Recipe #17: Chocolate Panna Cotta with Raspberry Sauce

First off, I apologize for taking a break -- between holidays, a sick baby, and having my wisdom teeth out, I've been a busy lady. Anywho, on with the show!

The first time I ever had Panna Cotta was at Pompeii Caesar inside Mohegan Sun Casino. It's a very expensive (albeit absolutely delicious) Italian restaurant inside the older part of the casino. I went there to have lunch with a reporter from Rolling Stone for an interview she was doing on myself and a bunch of other teen girls from my town (the rest of this is such another story for another day/blog/etc.). While we were there, the reporter let me order anything I wanted and after whatever my entree was, and at the tender age of 14, as long as it was being paid for by someone else, of course I wanted dessert.

I'd never had it before, but with literally the first bite, I was IN LOVE. It was creamy and delicious and like a little bite of heaven.

Cut to 11 years later, and I'm trying to come up with a nice dessert to make my husband after a long week of taking care of me after I had my wisdom teeth out. I thought of panna cotta, but there's only one problem -- he won't eat anything vanilla, custardy, pudding-like or creamy. No problem, I'll add chocolate and a touch of raspberry. Please note -- I usually include photos of my entire process, but since the first part, where I actually made the cream that I used, went so quickly, I didn't really get any photos. I did take photos while making the raspberry sauce, because that process was actually tougher. But trust me when I say that the words alone will be enough. It's a pretty simple recipe.

In the end, he loved it, and he's actually the one who suggested I blog my recipe. We thought it was delicious, and considering it made 8 servings, we'll happily be enjoying it for dessert for a couple more days.

Chocolate Panna Cotta with Raspberry Sauce

Cook time: 10 minutes
Cooling time: 15 minutes
Chill time: 4 to 24 hours

1 small packet unflavored gelatin
4 cups heavy cream or whipping cram
1 cup sugar
2 tablespoons plus one teaspoon water
1 8-ounce container of sour cream
2 teaspoons vanilla extract
1 tablespoon cocoa powder
4 ounces semi-sweet chocolate chips
1/2 cup fresh raspberries

Tools
large saucepan
mixing bowl
8 medium-sized (about 4 oz.) ramekins or containers for serving
ladle/large mixing spoon
food processor (optional)
small saucepan
handheld strainer/sifter

Melt chocolate chips in a double boiler, or microwave for 30 second intervals and stir, until melted. Set aside.

Take 1 cup heavy cream and whip until stiff peaks form. Set aside.

Mix gelatin with 2 tablespoons water and set aside. This will set in the container within 2 or 3 minutes. That's OK. It's supposed to.

In large saucepan, heat 1/2 cup sugar, cream, cocoa powder and vanilla over medium heat, but stir continuously to avoid boiling. Once heated through, add the set gelatin mixture. Stir until you don't feel any grainy pieces of the gelatin and remove from heat immediately. Pour in melted chocolate and stir to combine. Allow to cool thoroughly for about 15 minutes.

In mixing bowl, empty sour cream container. Once the cream-sugar mixture has completely cooled, use ladle to add spoonfuls of the mixture to the sour cream. Whisk to keep airy/light. Add the whipped cream. Once completely combined, pour into ramekins or serving containers and chill for at least for (up to 24) hours in refrigerator.

For raspberry sauce: Add raspberries to food processor and puree. If you do not have a food processor, use a fork to crush the raspberries, or a knife to chop. Add to small saucepan with remaining 1/2 cup sugar and teaspoon of water.


Cook over medium high heat until sugar has caramelized and is melted completely. Mixture should be bubbling.


Remove from heat. Set strainer/sifter on top of a bowl, and pour raspberry mix into it. Using a fork or spoon, move raspberry mixture around so as to move the remaining flesh and juice into the bowl, keeping seeds in sifter.


Please note: The yellow on the right hand side in the below picture is the reflection of the light in my kitchen. I didn't add anything to the mixture. :)


Panna cotta can be served in the ramekin/container or on a plate. To remove from ramekin, run a knife around the edge and turn ramekin over onto plate and tap the bottom. If the panna cotta doesn't come out right away, continue running the knife around the edges. This will separate it from the container.

Serve topped with raspberry sauce.


*Comments:

-Strainer/sifter: If you don't know what I'm talking about, here's a better picture of this tool.

Sunday, November 8, 2009

Recipe #13: Chocolate Bark

There is no simpler dessert than this one. I actually am planning on making it for our Christmas party because it makes a lot with very minimal effort. Someone brought something similar to this to work last year, and with one bite, I fell in love. When you make this recipe, please keep in mind that it's got to be reasonably quick so the chocolate melts the right way. Please note -- wherever you see a (*) next to an ingredient or tool, there is a comment about it below the recipe. Enjoy!

Chocolate Bark

Ingredients
1 10-ounce bag of semi-sweet chocolate chips
1 8-ounce Hershey bar
1 cup dark brown sugar
1 cup salted butter (room temperature)
Saltines crackers*
1 cup crushed walnuts or almonds

Tools
jelly roll pan or a cookie sheet with sides
aluminum foil or parchment paper
small sauce pan

Line jelly roll with foil or parchment, and cover with straight rows of saltines crackers. Crackers must lay flat in plan.


In small saucepan over high heat, combine butter and sugar. Stir frequently. When mixture reaches a dark brown color and is bubbling, it's finished.


Take mixture and pour it evenly over the crackers. Use a rubber spatula to spread mixture so it covers the crackers completely.


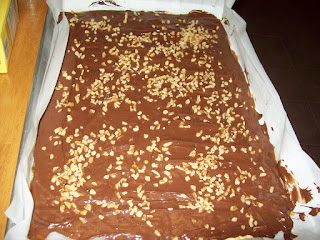
Quickly, pour the chocolate chips over the crackers and caramel. Break apart the Hershey bar and spread pieces all over the pan.


After 5 minutes, use the rubber spatula to spread the chocolate over the mix evenly, sprinkle with nuts.


Refrigerate for two hours. Break apart into smaller pieces, serve.


*Comments:
-Saltines: The amount you use will depend on the dimensions of your pan. My pan was 18x12, and I used 48 crackers.

Enjoy!

Tuesday, October 13, 2009

Restaurant Review: Wholly Cannoli, Worcester

After hearing about them on Phantom Gourmet, my husband and I decided to try Wholly Cannoli on Grafton Street in Worcester for our giving-dessert-as-a-thank-you-gift needs this past Sunday night. Though we had to make a beeline to get there by closing (7 p.m. on Sundays), it was convenient that they were even open Sunday nights whereas we'd be out of luck with most other bakeries. Though I'd heard good things on Phantom and had high hopes since even their website says they have the largest selection of cannolis on the east coast, I really thought, how bad can a store full of Italian pastries be?

I was pleasantly surprised to see that this wasn't just a little hole (whole?) in the wall (not that I wouldn't have gleefully ordered up a plethora of desserts had it been); there are several tables where you can sit and enjoy your baked goodness, but of course, they also do quite the take-out business. The selection -- not just of cannoli, but also cookies, cakes, and individual pastries is absolutely overwhelming.

As much as I would have liked to sample something from each category, I was there on a mission: cannoli. Delicious cannoli, and nothing else... until I laid eyes on a heavenly confection known as a "Dynamite Stick." I don't even know what they are, I thought, but "Two of those, please." Three caramel swirl cannoli, one white chocolate raspberry, two pumpkin pie, two chocolate chip, one Snickers, one tiramisu and two others that I don't recall the names of, but they had tiny peanut butter and chocolate chips on the end (I'm not a peanut butter person, but figured one of our guests may be) completed my order. I was impressed that the young lady behind the counter gently placed each pastry in the oversized box, and as a result, they were all in perfect condition when we went to dig in.


They all looked great, but admittedly... I was most excited about the "Dynamite Stick." When I got home (and immediately devoured one), I discovered that not only is it NOT a candy bar, it is quite possibly the most delicious dessert I've ever eaten. The Dynamite Stick is sweetened ricotta cheese, slathered in caramel, and covered in a hard chocolate shell. There is a coating on the chocolate also -- maybe cake crumbs? -- but I couldn't tell what it was. Not that it mattered, it could have been pickled cricket heads and I would still have delighted in every bite.

I didn't try every flavor, but can personally recommend the tiramisu and caramel varieties. They are as pretty to look at as they are tasty.

My one gripe with Wholly Cannoli is only their prices. For one dozen cannoli and two dynamite sticks (which are $4 each), the total came to $48. That's not to say that the food wasn't worth it, but if you're looking for tasty on a budget, especially for a crowd, you might be better off checking out a different shop in Worcester or a neighboring town. I should note, however, that their occasion cakes, which range from 8-inch round ($12.95) to full sheet ($60) and come in a vast variety of flavors, do seem very reasonably priced.

That said, the food was delicious, and it looked like a cute place to stop for a quick meal -- they also have a few breakfast offerings and a lunch menu with sandwiches on foccacia bread, pizza, wraps and salads -- and definitely a dessert, eat-in or take-out. If you have the extra dough (get it?) to spend, and you're looking for truly tasty and unique cannoli creations, Wholly Cannoli is the way to go.


Wholly Cannoli
490 Grafton Street
Worcester, Mass., 01604
(508) 573-0224
http://www.whollycannoli.com

Hours:
Monday - 7 a.m. to 7 p.m.
Tuesday - 7 a.m. to 7 p.m.
Wednesday - 7 a.m. to 7 p.m.
Thursday - 7 a.m. to 9 p.m.
Friday - 7 a.m. to 9 p.m.
Saturday - 7 a.m. to 9 p.m.
Sunday - 7 a.m. to 7 p.m.

Sunday, October 4, 2009

Recipe #9: Chocolate Beignets

While I have never myself had these outside of my own experience cooking them, my husband had. Beignets (prounced "ben-yays") are a sort of New Orleans style doughnut, minus the whole circle-with-the-middle-cut-out aspect. At the legendary Cafe Du Monde in New Orleans, they are topped with powdered sugar and served with cafe au lait. Well, I may not have gone the very traditional route -- though if you'd like to, visit the cafe's website, where you can buy their beignet mix -- and I substituted hot chocolate for the coffee, I think these beignets came out just wonderfully! Please note -- wherever you see a (*) next to an ingredient or tool, there is a comment about it below the recipe. Enjoy!

Chocolate Beignets

Prep time: 20 minutes, plus dough rising time (4 hours to overnight)
Cooking time: 30 minutes oven rising and 5 minutes frying

Ingredients
1 envelope active dry yeast
2 tablespoons butter
2 Hershey bars, 1.55 ounces each
3/4 cup luke warm water
1/4 cup sugar
1/2 cup evaporated milk
pinch of salt
1 egg
4 cups flour
1/8 cup shortening
oil to fry

Tools
deep fryer or pan for frying*
cookie sheet
mixing bowl
rolling pin
greased bowl
stand mixer
parchment paper*

Before beginning, melt one chocolate bar either in a double boiler or even in a bowl in the microwave.

Combine yeast, water and sugar in bowl of stand mixer, and allow to sit until yeast starts to bubble -- about 5-7 minutes. Beat egg and add to mixture along with salt and evaporated milk.


Mix on low, and slowly add two cups of flour. Keeping mixer on, add half the shortening, allow to combine, add remainder of shortening, melted chocolate and remainder of flour. Do not overmix or dough will become too tough.

Remove bowl from mixer and place dough in greased bowl (tip: use butter wrapper to grease). Cover with foil or plastic wrap and allow to rise in the refrigerator overnight, or for at least four hours. Dough should *about* double in size.


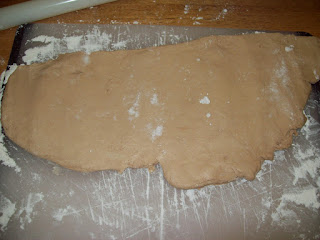
When dough has risen, place on floured surface and roll til 1/2 thickness is reached.


Cut into strips or rectangles, and place on parchment paper-covered cookie sheet, and put into 175-degree oven for 30 minutes (beignets should rise a bit, but not actually cook).

Remove from oven, and beignets should feel slightly toasted to the touch.


Fry in oil -- either in deep fryer or pan with about 3 inches of oil -- until golden brown, flipping halfway through.


After frying, place on paper towel to drain.


Melt second chocolate bar with butter. Frost beignets with chocolate, and serve warm.


*Comments:

-Deep fryer: Cook these in oil that has reached 375 degrees. It's hard to tell in a regular pan whether the oil has reached that temp, which is why I *much* prefer to use a regular fryer. I bought mine at Walmart and use it all the time. It's very easy, and if you like it, you can find it/buy it here.

-Parchment paper: Please believe me when I say this -- for all intensive purposes, including anything that involves heat, WAX PAPER AND PARCHMENT PAPER ARE TWO DIFFERENT THINGS. If you're using them outside the oven, sure, they are pretty interchangeable. But I beg of you, for the love of all that it holy and for the sake of your bakeware... be kind, only use parchment in the oven! Aside from the fact that the wax on wax paper melts in the oven and can ruin your bakeware (just ask my husband!), you will discover a new-found love for the seemingly magical parchment paper. Never lose a cake bottom to a heated pan again! :)