Sunday, November 29, 2009

Recipe #15: Banana Egg Rolls

I know the title of this sounds weird. When you think of "egg rolls," you generally think of the type you'd get at a Chinese restaurant -- filled with cabbage, carrots and either pork, chicken or shrimp. Why mix that with bananas? Have no fear -- no weird mixing here.

When I lived in California, someone I worked with used to bring something similar to this in to share (generally with me, because I would eat... a bunch). She called them "banana fritters," but when I picture fritters I think of the apple or clam variations -- tiny balls of fried dough. These aren't those. I never knew what was in her recipe for her "banana fritters," except banana, but I never forgot them.

So I came up with this dessert dish. Not to toot my own horn, but my husband, who hates bananas, LOVED this recipe. This makes seven egg rolls and while that might not sound like much, they are so sugary and rich that it will take only one to fill you up. Enjoy!

Banana Egg Rolls

Ingredients
3 bananas
1/4 cup sugar
1 tablespoon brown sugar
1/4 teaspoon cinnamon
2 tablespoons salted butter
7 egg roll wrappers*
1 teaspoon vanilla extract
2 tablespoons chopped walnuts*
pinch of salt
vegetable oil (for frying)
whipped cream (for garnish)
raspberries (for garnish)*

Tools
food processor
non-stick skillet
pan with 2-3 inch sides (for frying)
pie plate or any flat pan/plate

Combine sugar, brown sugar and salt in pie plate, use fork to stir together and break up brown sugar. Cut bananas in half or in thirds length- and width-wise. Roll each banana gently in the sugar mixture, to coat both sides.


Heat butter in skillet. When melted, place sugar-coated bananas in pan. Cook on medium-high heat until sugar has melted. Turn bananas over, allow other side to cook for 3 minutes or until the bananas have turned golden and the sugar has all caramelized.


Remove from heat and place bananas (and any liquid/caramel from the skillet) in a food processor. Add cinnamon and vanilla, puree. Once pureed, stir in chopped walnuts.


Heat vegetable oil in larger pain, allow to heat until oil is rippling, or responds to a drop of water hitting the surface.

To fold egg rolls... place wrapper diagonally so corners are pointing up, down, left and right. Place about two tablespoons of the banana mixture in the center of the wrapper. Fold the bottom up over the mixture. Fold the sides in (I wet the points so they'll stick), and then roll towards the top point. Moisten point, stick to body of the egg roll.


When finished folding, place egg rolls into oil. Fry about 3 minutes on one side (or until golden brown), turn over.


When both sides are golden brown, remove from oil, drain on a paper towel.


Serve warm, garnished with whipped cream and raspberries.


*Comments:
-Egg Roll wrappers: I only ever use Nasoya brand wrappers. They are readily available at pretty much any grocery store, and they are consistently a good quality.

-Walnuts: If you prefer, you can also use pecans or almonds in place of the walnuts. I happened to have those on hand, but it could easily be substituted, and delicious.

-Raspberries for garnish: You could serve this garnished with banana slices, but I prefer the raspberries. The reason is that these egg rolls are so incredibly sweet, I think the raspberries add a little bit of tartness to the dish, and balances it out better. For the same reason, I use whipped cream instead of drizzling chocolate or caramel over them. You could definitely do that, but I just think the whipped cream -- aside from being great to "dip" the egg rolls in -- gives something that would be heavy because it was fried, a light airiness.

A special note on egg roll wrapping... Mine were not perfect, but that's okay. You're frying these, so as long as the end of the wrapper sticks to the rest of it, you'll be okay. It's similar to wrapping a burrito, but as if you were using a pointy tortilla instead of a round one. Make sense? For a better explanation than mine on how to properly roll an egg roll, check out the back of a Nasoya wrappers package. They have a visual on how to do it, and it really helps.

Enjoy!

Sunday, November 22, 2009

Advice needed: How to avoid turkey jerky

For this first time, my husband and I are staying home for Thanksgiving this year. We would like to start our own traditions with our new baby, and thought this would be the perfect time to start.

I am very much looking forward to all the cooking, but there's just one problem...

...I've never cooked a turkey.


Me, posing with my mom's traditional 60 pound turkey as a tot. Ah, the memories.


Since it's just the two of us (as much as we wouldn't mind pumping a little tryptophan into the little guy post-dinner), I bought an 11 pound frozen turkey.

I've heard that I should brine the bird, and a friend passed over Emeril's recipe for brining and roasting. Some ladies at work told me to ignore everything anyone on TV said, cut up oranges, shove them in the bird, and stick it in the oven. Some people say baste, some people say it makes no difference.

The only thing I know -- the word "giblet" is not in my vocabulary. There will be no turkey organs in any gravy or stuffing of mine.

My other obstacle... I am cooking for a guy who doesn't enjoy turkey (he will "choke down a piece, once a year"), loathes mashed potatoes, hates vegetables, gets grossed out by stuffing, and becomes ill at the site of gravy. Eesh.

He's said he'll eat the turkey. He'll eat roasted potatoes, but not mashed. He'll eat a few roasted onions, but absolutely no carrots or sweet potatoes. And if I deglaze with a little white wine, he'll try the gravy. But our one source of contention... stuffing.

He will NOT eat it. I'm all for stuffing -- be it homemade, Stove Top, whatever. I'll eat it with delight and yes I'll take a second helping please. It's not Thanksgiving without it. John would rather eat the newspaper.

I asked him what it was he didn't like, and he said he really wasn't sure -- couldn't pinpoint it, but it likely came from "the disgusting celery pieces." Oh ye of little vegetables.

So, faithful readers -- both of you -- I need help with two things:

Do you have any tips for turkey cooking? And, any recipes for stuffing without "the disgusting celery pieces"? Please add them to the comments, if you do. My husband and his stomach thank you.

Saturday, November 14, 2009

Recipe #14: Chicken Pot Stickers

For my husband's birthday last weekend, we took a trip to the Cheesecake Factory. I've actually only ever eaten there twice in my life but loved the food both times, so I was looking forward to it. We tried an appetizer that we've seen at restaurants and in stores, but never actually had -- chicken pot stickers. Oh my gosh, "amazing' doesn't quite do them justice.

So, since we can't make it to the Cheesecake Factory every weekend (maybe someday when we're rich, haha), I decided to make my own version. This isn't exactly the same. The "filling" in the CF version is JUST chicken. I added cabbage and green onions to give it a little more flavor because I knew my chicken would never taste like theirs! Enjoy! Please note -- wherever you see a (*) next to an ingredient or tool, there is a comment about it below the recipe. Enjoy!

Chicken Pot Stickers

Ingredients

2 green onions, finely minced
1/2 teaspoon freshly grated ginger*
wonton wrappers*
1/4 cup shredded red cabbage*
6 ounces plus two tablespoons soy sauce
8 tablespoons vegetable oil
3/4 pound chicken tenders*
1 cup flour
3 tablespoons sesame oil*
1 tablespoon sugar
1 1/2 cups water

Tools
small skillet
small sauce pan
large non-stick pan
food processor

Heat small skillet over medium-high heat, add soy sauce and 2 tablespoons vegetable oil.

Cut chicken into one inch pieces. Place in mixing bowl and toss with flour until evenly coated. Add to heated pan, cook about 10 minutes (turning to cook evenly) until both sides are browned and crispy. Drain.


When chicken has cooled enough to handle, food process using shredding blade (Use chicken pieces and any "breading" that has come off while draining). Add shredded chicken to a mixing bowl and add minced green onions and shredded cabbage. Toss to combine, add tablespoon of sesame oil and a dash of soy sauce for flavor. Set aside.


For sauce:
In small saucepan, stir together soy sauce, sesame oil, sugar, and grated ginger. Heat over medium heat until bubbling. Allow to remain on stove for 5 minutes, then remove from heat and set aside.

Remove wonton wrappers from package one by one. Place 1 tablespoon of the chicken/cabbage/onion mixture in the center of each wonton. Use your fingers and water to wet all edges of the wonton. Fold the ends diagonally across from each other up towards the top. Press points together, fold the other two ends up and press. You will end up with small, square "packages" off filling. (You will cook these in two batches.)


Heat 3 tablespoons of oil in the large non-stick pan. When heated, slowly add wontons around the edge of the pan. Cook for 2 minutes or until the bottom of each wonton is slightly browned. When this has happened, CAREFULLY, SLOWLY add 1/2 cup water into the center of the pan. Add lid to pan, and allow to cook for 2-3 minutes or until wonton wrappers become translucent. (Repeat with second batch.)


Place some of the sauce on the plate ahead of placing the wontons, then add more over the top once the wontons are fully plated. Serve hot, garnish with chopped green onion.


*Comments:
-Ginger: If you're not a fan of ginger -- I normally am NOT at all, but when grated on a microplane, it becomes more like a paste and therefore tolerable -- you can completely leave it out. It does give a depth to the flavor of the sauce though, and this is a very, very small amount to add.

-Wonton Wrappers: I used Nasoya brand wrappers. They sell these wonton wrappers, but also eggroll wraps and tofu. You can generally find their products in the organic food section. I know the process above for folding them sounds difficult, but trust me, it's not. I have very little hand-eye coordination, and I managed! Also, When you're not using the wrappers -- in between folding wontons -- keep them covered with a damp towel, to keep them from drying out.

-Cabbage: I used red... truthfully, because I forgot to buy Napa cabbage at the store, and to me the taste is no different. If you only have the regular green variety, just use that. No need to make a trip to the store for that!

-Chicken:
Just to clarify, when I say "chicken tenders," I mean "chicken tenderloins," the raw chicken -- generally the most expensive, because you're only getting the best sections of the white meat -- in the meat section of the grocery store. I am NOT talking about breaded chicken tenders.

-Sesame Oil: You might think you can do without it for this recipe, but I beg to differ. I had never in my life cooked with sesame oil until now. I had smelled it and tasted it, but never cooked with it myself. Trust me, it's worth the $5 for the 8-ounce bottle. If you've ever had a Chinese dish and thought that you could probably make it at home if not for that ONE unidentifiable ingredient... that ingredient is sesame oil. It is deep and nutty, and you only need a little to get a lot of flavor. It's worth it!

Sunday, November 8, 2009

Recipe #13: Chocolate Bark

There is no simpler dessert than this one. I actually am planning on making it for our Christmas party because it makes a lot with very minimal effort. Someone brought something similar to this to work last year, and with one bite, I fell in love. When you make this recipe, please keep in mind that it's got to be reasonably quick so the chocolate melts the right way. Please note -- wherever you see a (*) next to an ingredient or tool, there is a comment about it below the recipe. Enjoy!

Chocolate Bark

Ingredients
1 10-ounce bag of semi-sweet chocolate chips
1 8-ounce Hershey bar
1 cup dark brown sugar
1 cup salted butter (room temperature)
Saltines crackers*
1 cup crushed walnuts or almonds

Tools
jelly roll pan or a cookie sheet with sides
aluminum foil or parchment paper
small sauce pan

Line jelly roll with foil or parchment, and cover with straight rows of saltines crackers. Crackers must lay flat in plan.


In small saucepan over high heat, combine butter and sugar. Stir frequently. When mixture reaches a dark brown color and is bubbling, it's finished.


Take mixture and pour it evenly over the crackers. Use a rubber spatula to spread mixture so it covers the crackers completely.


Quickly, pour the chocolate chips over the crackers and caramel. Break apart the Hershey bar and spread pieces all over the pan.


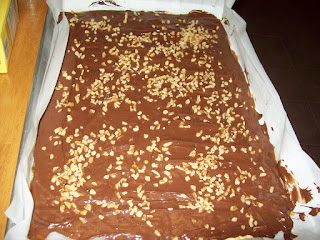
After 5 minutes, use the rubber spatula to spread the chocolate over the mix evenly, sprinkle with nuts.


Refrigerate for two hours. Break apart into smaller pieces, serve.


*Comments:
-Saltines: The amount you use will depend on the dimensions of your pan. My pan was 18x12, and I used 48 crackers.

Enjoy!

Thursday, November 5, 2009

Recipe #12: Fish Tacos

If you've never lived on or visited California, I know what you're thinking -- "That sounds disgusting." That's what I thought too. I was so wrong.

What I pictured was a fillet of broiled fish in a hard shell taco with lettuce and tomato. The Californian (Baja style) fish taco could not be any more different. It's actually beer battered cod, minus the lettuce and tomatoes. One delicious, crispy, salsa and cabbage-laden taco from Rubio's was all it took -- I was hooked for life.

When I moved from California (Hi Mary, Keala, Traci, Christin and Savannah!), I can't tell you how much I missed fish tacos. I tried a bunch of times to replicate the recipe, but before I had a deep fryer, it was really difficult to try to get the fish crispy but not drenched in oil. Finally, I have.

Many of the ingredients below are just what I serve with the tacos. A proper fish taco from Rubio's is fish on a corn tortilla (though you'll see I use flour -- none of the corn tortillas I have tried from around here have the same consistency as theirs. Better to just go with flour), cabbage, a dab of white sauce, smothered in one of their salsas from the salsa bar (I prefer the hot. If you'd like the recipe I make, you can find it here). Trust me, it takes a little effort, and you *do* deal with your kitchen smelling oily for a few hours, but it's TOTALLY worth it.


Fish Tacos

Prep time: 30 minutes
Cook time: 20 minutes (for all fish)

Ingredients
1/2 pound cod* (this is about one fillet)
2 cups flour
3 tablespoons garlic powder
1 teaspoon dried minced onion
1/2 teaspoon paprika
2 tablespoons onion salt
1 12-ounce can of beer*
1 lime*
2 cups grated cabbage
8 flour tortillas*
2 tablespoons mayonnaise
2 tablespoons unflavored plain yogurt

Tools
deep fryer (or shallow non-stick pan with at least 3" sides)*

For batter: In a small mixing bowl, mix flour, garlic powder, minced onion, paprika, onion salt. Add can of beer 4 ounces at a time, mix until the batter coats the back of a fork or spoon.


Heat deep fryer or oil in pan to 375 degrees. Place fish in batter bowl, coat liberally with batter. Slowly place into oil/deep fryer. Be careful not to drop or oil will splatter. Use a fork and carefully release fish from fork to avoid splatter or fish sticking to the bottom of the pan or basket. Cook until golden brown, and drain on a plate covered with paper towels.


To serve with the fish: Grate or finely chop cabbage -- red or green -- and cut a lime into 8 even pieces. In a ramekin, mix yogurt and mayo to make white sauce. If making larger proportions of fish, use equal parts yogurt and mayo, mix until the mixture is thinned.

Heat tortillas in microwave for 20 seconds, serve all ingredients -- tortillas, fried fish, cabbage, salsa, limes -- on a platter. Guests can assemble their own tacos. Optional: serve alongside chopped cilantro. Makes 8 tacos.


*Comments:
-Fish: I used cod fillet, because that's what Rubio's uses, and what we had at the grocery store the day I made this. If you cannot find fresh cod at your seafood counter, use any white fish. I've also made this with flounder, and it worked very well. Don't bother buying frozen boxed fish, as the fish's texture has totally changed, even during the thawing process. Frozen fish from the seafood counter is okay though. But do NOT let this thaw at room temp, unless you enjoy a very fishy-smelling house. Let it thaw, still wrapped, in the refrigerator for a day. Also, I used one fillet (1/2 pound) for this dinner, and got 8 tacos out of this. This is because I cut the pieces small, knowing they'll puff significantly during frying. Here's how big each piece of fish was, and this made 8 good sized tacos:


-Beer: We happened to have Budweiser in our house, but you can use any beer you have lying around (not actually lying around -- eww, skunky). I have used Bud, Bud Light, and Corona to make this, and they were all equally good. As common sense would tell you -- lighter beer, lighter-tasting batter. Darker beer, heavier-tasting batter.

-Tortillas: If you really prefer store-bought corn tortillas, go ahead and use them. While that is what Rubio's serves, none of the ones I can find at any store here are worth it. They are all far too powdery and dry. I used Old El Paso flour tortillas made for "Soft Tacos and Fajitas." According to the package, they're 6-inch round tortillas.

-Deep fryer/hot pan with oil: Just a few safety tips here, because I have made some mistakes before getting the hang of how to fry things withOUT ending up with burn marks.

*First off, if you've washed your hands, have water boiling or handle a damp cloth while frying or before frying. When water comes into contact with boiling lava hot oil, you have a splatter and the potential for a NASTY burn.

*Don't drop food into it. You drop food, you get burned.

*Do not OVERFILL your fryer. This means actually reading the instruction book. It will tell you the fryer's oil capacity, so you can make sure you're not putting too much or too little. For example, mine has a minimum capacity of 2 liters of oil and a maximum of 3 liters. I generally cook with about 2.5. If you overfill or under fill, you can cause serious damage to the surface you're cooking on (please, please, please make sure it's heat-resistant), to the fryer, and to yourself. Read: this is the stuff stories on the news are made of.

*When you're done cooking, don't discard of oil down the drain. Save it. Otherwise, it can harden in the drain and clog it. Then you have to pay a plumber and... that's just a lot of hassle you don't need.

*Lastly, don't put too much in the fryer at one time. With this recipe, I stick to two pieces of fish at once. Otherwise, the temperature of the oil will drop, and you end up with soggy, oil-logged fish. No one wants that. Keep your fish happy. Don't add too much at once.

Enjoy!

Wednesday, November 4, 2009

Recipe #11: Rustic Dinner Omelette for Two

Sometimes there's nothing better than breakfast for dinner. Most weekends, we try to get as much sleep as we can to catch up for what we've missed during the week, and I'm rarely in the mood to get up and make a big breakfast. But this omelette, aside from being delicious, is so hearty that you can eat it for pretty much any meal. Just a note, when I say you need a cup of "meat" below, I'm purposely leaving it indiscriminate. I used leftover pork from when I made carnitas (if you want that recipe, I got it here and it came out delicious. The only difference was that my supermarket didn't have pork butt, so I used shoulder). You can use pork, , chicken, sausage (Italian, breakfast, turkey, tofurkey... anything you like), or even ground beef if that's more up your alley. Use what you have around. That's the great thing about this recipe -- most of the ingredients are things you probably already have laying around your house. Enjoy!


Rustic Dinner Omelette for Two


Prep time: 20 minutes
Cook time: 30 minutes

Ingredients
4 strips maple-flavored bacon (about 1/4 pound)
1/2 cup chopped onions
2 cups diced potatoes
3 slices of pickled jalapenos*
6 eggs
3 tablespoons milk
1 1/2 cups shredded cheddar cheese*
2 scallions*
5 tablespoons butter
1-2 cups meat (beef, pork, chicken, etc. as mentioned above)

Tools
large skillet*

Preheat oven to 375. Cook bacon to crisp, remove from pan to drain but do not discard liquid. Add potatoes and onions and cook til soft and translucent (about 10 minutes). Add two tablespoons of butter to pan, cook another 2 minutes. Add meat and bacon, cook for 5 minutes.


While this is cooking, crack 6 eggs into a mixing bowl, scramble. Add milk, cheese and scallions, mix.


Remove skillet from direct heat, allow to cool for two minutes. Add milk/eggs mixture to skillet, fold together carefully but do NOT stir. Top with small amount of cheese.


Place skillet directly in oven for 25 minutes. When time has passed, turn oven off, remove pan and top with three pats of butter. Place back into the oven for 3-5 minutes or until butter melts.


Allow to cool 10 minutes before serving. Serve with side of sour cream (optional).

*Comments:
-Jalapenos: This just gives it a little kick. If you don't like the spice, you don't have to use them. Also, if you don't have a jar of the pickled variety around, use about a tablespoon of minced fresh jalapeno.

-Cheese: This doesn't have to be perfect, so don't bother measuring it out. Use about a handful and a half of cheese.

-Scallion: Also known as a green onion, some people think you shouldn't use the green part of a green onion. To me, that's ridiculous. It all tastes the same, and it gives the dish brightness. They're oniony but mild, and cook perfectly into this.

-Skillet: You don't need a huge pan for this -- nothing wok-sized required. My skillet was 10 inches.

Enjoy!